Shelter
All content copyright © 2010-2024 Frank Revelo, www.frankrevelo.com, United States copyright office registration number TX-7931345
Comparison of tents, tarps, bivies
Tarp plus bugbivy has many advantages compared to tent:
- All shelters must be dried before being put into storage, or else they will mildew. This is more difficult with tents than tarp-bugbivy combination.
- Most tents have zippers, which can wear out when they get dirty with sand and dust, which abrades zipper and eventually causes it to fail. Tarps have no zippers and bugbivys can be designed without zippers.
- Another part of tents subject to heavy wear and early failure is floor. Possible to have floor repaired or replaced, but that can be a nuisance. With separate bugbivy, just replace bugbivy when floor excessively worn, at cost of perhaps $40 in materials and 4 hours of labor.
- Tent poles are reasonably sturdy once installed in pole sleeves of tent. But during set-up and take-down, poles can be easily broken if mishandled. Possible to repair broken poles in field, using repair sleeves or duct-tape, or to bring along spare poles. However, this adds weight and takes up more space in pack. It is sometimes very difficult to buy replacement poles while traveling. Tarps can use hiking poles or sticks or trees as supports. There are some tarp tents which use hiking poles as supports, but they tend to be particular about exactly which types of hiking poles they will accept. For example, they may require adjustable height poles with ski-tip ends. Tarp tents normally won't work with just any stick from forest, like tarps. In the course of long travels, I have both lost and damaged hiking staffs, so this is a consideration for me.
- Tents require more manual dexterity to set up and take down than tarps. This can be a problem for solo hikers if hands are numb from cold or one hand injured. (Possible to use tent as improvised bivy sack, when impossible to set up tent for whatever reason.)
- Tents usually weigh more than tarp-bugbivy combination. Even very light tents, such as Hilleberg Akto, weigh about twice my current tarp-bugbivy system. Exceptions are tarp tents, such as those of Six Moon Designs and Henry Shires.
- Even best ventilated tents have much worse ventilation than tarps. This is primarily an issue in warm and humid summer conditions, when tents can feel stifling. Again, tarp tents are exceptions to this rule.
- Most tents cannot be easily used inside of mountain huts or in other situations where protection from bugs and ground moisture is needed but not necessarily rain protection. Free-standing tents could be used in some of these situations, but free-standing tents tend to be either heavy or poorly ventilated. Bugbivy perfect for such conditions.
- Tents (including tarp-tents) normally won't setup properly on uneven ground. If there is a large bump or rock or plant in one corner for example, this will distort geometry of tent so that it can't be pitched correctly. With a tarp, corner can simply be lifted up a bit to get past whatever is in the way. Thus while total footprint of tarps is often larger than that of tents, amount of cleared space required is usually smaller. Waterproof-breathable bivys have smallest footprint of any shelter system, but this sole advantage is offset by many disadvantages, as discussed below.
Shelter with small footprint allows camping directly on trail, which is convenient in rugged mountains. In 2011, I kept a record of my camp sites while section hiking the PCT. Out of 64 nights camping, 11 or 17% were on the trail itself, because that was the best spot available. This is probably representative of my experience over the years, both in the United States and Europe. Camping directly on the trail is also zero-impact to the environment, since trail surface already compacted and devoid of vegetation. Especially on long-distance trails in the United States, hikers often night hike to avoid heat and/or increase mileage because of tight schedules. So if camping on trail, make sure there is a way for other hikers to get past.
One advantage of well-designed and correctly pitched tent is better protection against wind, compared to tarp plus bugbivy, whether wind is blowing rain, snow, dust, sand or just plain air. Double-walled tent with fully-enclosed fabric inner tent, for example, provides excellent protection from rain spray, spin drift, wind-blown dust and sand, and is considerably warmer than open tarp plus bugbivy. However, reality for me and most other 3-season hikers is that such storm and cold conditions are the exception rather than the rule. Tent might provide additional comfort on some occasions during a long-distance hike, but this must be offset against decreased comfort on other occasions (such as warm, humid nights), to speak nothing of continual decreased comfort due to additional weight of tent versus a tarp plus bugbivy, or decreased comfort due to tent breaking at worst possible time.
Secondary advantage of tents is that they provide more privacy in crowded campgrounds than tarp plus bugbivy. This issue can be largely addressed by adding a back panel to tarp and then facing tarp towards wall or bushes. Alternatively, poncho hanging from ridge-line partially blocks view into front of my tarp, while still allowing far more ventilation than most tents.
In winter conditions, double-walled tent (preferably free-standing) is normally required, in order to avoid condensation within sleep gear. Idea is that temperature within inner tent can be raised sufficiently that moisture condenses on walls of inner tent as hoar frost, rather than condensing inside sleep gear. With single-walled tent or tarp, it will normally be necessary to use a vapor barrier to protect sleep gear from condensation. I don't camp in true winter conditions, so this is not a consideration for me.
For an intimate couple, tent might be a better choice than tarp plus bugbivy, all things considered. Intimate couple usually wants to sleep side by side, and thus footprint advantages of tarp plus bugbivy for solo hiker disappear—couple will just have to continue hiking until large enough spot is found. Single well-ventilated 2-person tent is only slightly heavier than large 2-person tarp plus bugbivy. Weight penalty of spare tent poles and cost of replacing tent due to broken zippers and worn-out tent floors is spread over 2 persons, and thus these become less significant factors. Most likely emergency will involve injury to just one hiker, and healthy hiker will be able to pitch tent by themselves, and thus emergency advantages of tarp plus bugbivy for solo hiker disappears. Couples tend to be more desirous of privacy afforded by tents than solo hikers. Then again, large tarp and large bugbivy is also a good choice, since it has better ventilation than even the best ventilated tents.
For two people hiking together on a long-distance trail, who do not constitute an intimate couple, best choice is probably a separate tarp plus bugbivy for each person. First, it is quite common outdoors, especially in the mountains, to have numerous spots just large enough for one person to lie down comfortably, but no spot large enough for two people to lie down comfortably side by side. In particular, as noted above, trail itself is often most comfortable spot available, but trail itself is normally only wide enough for one person. By having separate shelters, each person can use one of these comfortable spots, instead of one person being forced to lie in a spot that is very uncomfortable. Also, it is only too common for one person of such a team to become injured (knee and foot problems, in particular) and then for both members of team to agree that healthy member should continue hiking while injured member goes home to recuperate. Starting out with a separate shelter for each person prepares for this contingency.
Waterproof/breathable bivy sacks (as opposed to bugbivies with a netting top) are not advisable unless absolutely necessary, such as when camping in snow caves or mountain-climbing, but I have no experience with those conditions. If it rains, water will enter bivy sack when entering or exiting. Hibernating inside a bivy sack during extended periods of freezing rain or snow will be much less comfortable than under a tarp or tent. In particular, bivy sack will make it difficult to eat, much less prepare food, and will not allow sitting up and otherwise changing position so as to avoid a backache from lying down for days upon end. Condensation in sleep gear will be much worse than with either tent or tarp plus bugbivy. Synthetic rather than down insulation is thus strongly recommended if you foolishly decide to use a bivy sack. Some people put a small tarp over a waterproof/breathable bivy sack, so that the bivy sack can be opened for maximum ventilation and so there won't be so much radiant heat loss from bivy sack itself, both of which will reduce condensation, though not eliminate it. In hot weather, waterproof/breathable bivy sack under a tarp will be excessively warm and thus uncomfortable compared bugbivy under tarp. In cold weather, waterproof/breathable bivy would give better protection from cold wind than bugbivy, at cost of more condensation in sleep gear. Condensation could be addressed by adding vapor barrier liner inside sleep gear, but vapor barrier liners are a nuisance and make it impossible to wear clothing while sleeping, so sleep gear has to be thicker, adding more weight. If cold wind is an issue, free-standing tent would be a better option than tarp plus waterproof/breathable bivy plus vapor barrier liner.
Weather in the Sierras and desert in summer is often dry, so that sleeping without a tarp is a possibility. This is inadvisable where bears and mountain lions are present. Both of these animals, but especially mountain lions, tend to be cautious around humans, and are thus unlikely to tear through a tarp when they can't be sure whether there is one or more than one humans inside, or whether human is asleep versus awake and prepared to defend himself, etc. Whereas if a desperately hungry mountain lion were to come upon a human sleeping cowboy style, without a tarp, on his side and with the back of his neck conveniently exposed—that is a different story. It takes maybe 5 minutes to set up tarp in the evening (assuming no rocks are required) and 2 minutes to take it down in the morning—peace of mind given by sleeping under a tarp versus cowboy style is well worth this time, in my opinion. Click here for news report of mountain lion attack on lone hiker sleeping without a tarp or other shelter overhead.
Another reason to sleep with a tarp overhead, especially in cold weather, is to reduce radiant and convective heat less, and thus keep sleep gear warmer and so reduce condensation in sleep gear. Radiant heat loss is especially severe when sky is clear and there are no trees overhead. Tarps reflect some radiation from sleep gear, reducing radiant heat loss. For maximum reflection, tarp fabric should have reflective coating, but coated fabrics are not widely available, weigh more and reflective coating tends to wear off after a few months of use. Next best is light-colored tarp (white, silver grey) rather than dark-colored tarp (forest green, black). Tarp also traps warm air rising from sleep gear to some extent, especially in foot area if tarp enclosed there, as mine is. This cushion of warm air reduces heat gradient between sleep gear and air, slowing conduction of heat from one to the other followed by rising of warm air and thus permanent loss of heat (convective heat loss). Tarp blocks wind to some extent, reducing convective heat loss.
Homemade Tarp and Bugbivy
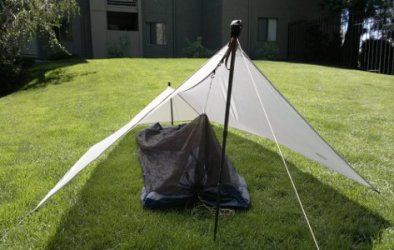
My initial tarp was Ray Jardine-style, 9' long by 7' wide with beaks on both end, purchased from Golite (no longer sold there). Beaks required tarp poles to be about 10" from tarp for proper setup, which meant poles had to be fairly long to get proper pitch. This was a problem for me, because I only carry a single hiking staff, rather than dual hiking poles, and that single staff was not long enough even for front of tarp, but that was my only available pole when camping either above tree-line or in organized campgrounds, especially in Europe. (European campgrounds usually have bushes to separate camp sites, and it is forbidden to tie tarps to these bushes. It is also usually forbidden to tie tarps to trees and trees are usually inconveniently positioned for this anyway.) Also, Jardine-style tarp has two side tie-outs instead of one, which requires carrying extra stakes. Finally, Jardine-style tarp is much wider than my current tarp in the foot area. If pitched low in foot area, either for wind protection or because I am unable to find a second long pole, this means tarp will have very wide footprint in foot area, which can sometimes make it difficult to find a large enough site for pitching tarp. Also, extra width results in sagging in foot area. So eventually I switched to my own tarp design.
My initial bugbivy was also Ray Jardine-style, which he called a "net tent", also purchased from Golite (no longer sold there). This bugbivy had several problems: (a) more of a nuisance to set up and enter/exit than my current bugbivy; (b) lacked a secure closure, so various annoying bugs can crawl in at night (ants, spiders, beetles). Jardine later redesigned his bugbivy to incorporate a zipper closure, and he sells kits for this new design on his website. I designed a bugbivy with ridgeline zipper myself, after becoming dissatisfied with Jardine's original net tent, and discovered (just as Jardine warned about in Beyond Backpacking) that zippers are prone to failure in the field. Evidently Jardine has forgotten this fact about zippers. Both of Jardine's bugbivies are much more complicated to sew than my designs.
Some hikers get by with just a groundsheet, rather than bugbivy, but there is little weight savings compared with my current bugbivy design, and of coursesimple groundsheet lacks bug protection and also lacks bathtub floor to protect from running or ponding water.
Current tarp details here.
Current bugbivy details here.
Tarp Poles

Hiking stick is front pole. Rear pole cut from old hiking stick, then rubber tip placed on end and orange duct tape around center, so doesn't get left behind when packing up: 85g, 21.6" long.
Initially, instead of carrying rear pole, I followed Ray Jardine's recommendation to pick up stick from forest just before making camp. However, I found myself frequently camping in areas with no forest around, such as above treeline or developed campgrounds. Also, even in the middle of a forest, it can take some time to find an appropriate stick. So I decided it was simpler to just carry rear pole with me.
Previous rear tarp pole was lightweight plastic tubing from hardware store, 23" long by about 7/8" diameter, 55 grams. I broke one of these poles by stepping on side and began to worry about durability, which is why I replaced with pole cut from old hiking stick.
Both front and rear poles can sink into soft ground. Use flat rocks or pieces of thick bark underneath to prevent this.
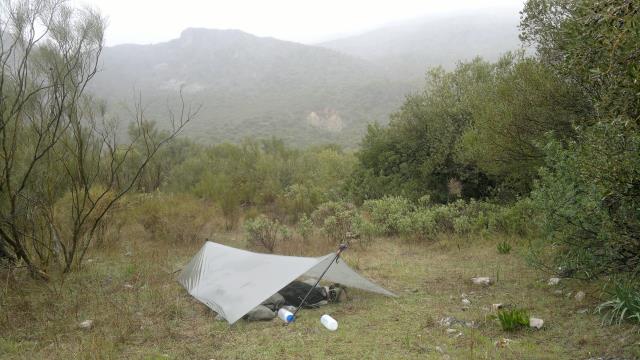
If wind very strong, pitch tarp low, as shown below. Also, even if tarp set up taut initially, it will become loose if nylon fabric becomes wet from rain or condensation. This is because all nylon, coated or uncoated, stretches when wet. Tarp guylines are made of polyester, which also stretches to some extent when wet, though much less than nylon. By setting front tarp pole at angle initially, it is easy to lift tarp and thus tauten it by straightening front pole during night.
Tarp Stakes
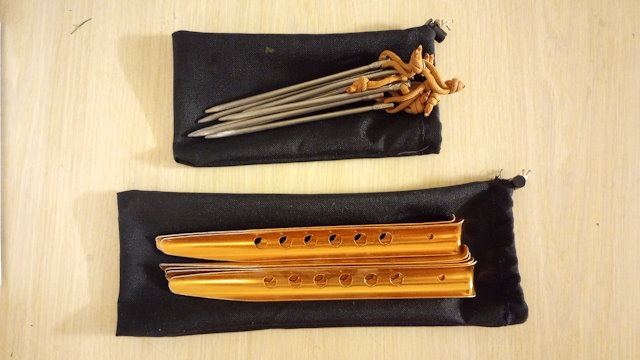
For hard ground, I carry 8 Vargo titanium nail stakes, from Backcountry Gear or MoonTrail. These weigh 15 grams each, or 120 grams for set of 9, plus 25 grams for stuff sack, details here. Normally, these are the only stakes I carry. Tarp only requires 6 stakes for setup, but is more stable in strong winds with 2 additional stakes for sides. These stakes are easy to lose and impossible to replace while traveling, so 2 side stakes also serve as spares.
For bicycle tours only, where sandy ground is common, I additionally carry 6 aluminum sand stakes, from REI. About 26 grams each, or 155 grams for set of 6, plus 35 grams for stuff sack, details here. Sand stakes bend easier than nail states, so I only use them after first checking whether nail stakes will hold or not. Attach guyline to nail stake, determine location for nail stake if ground were solid, drive sand stake into ground at this location, put nail stake through hole in sand stake (making sure guyline will not rub against sand stake in case tarp flaps in wind), as shown below:

Nail stakes came with red nylon pull cords, which are fairly durable. But once a pull cord broke, after pounding stake into limestone and then struggling next morning to pull it free. So now I carry two pre-cut spare cords in repair kit. Red color for pull cords is important, since silver-colored stakes are nearly invisible if dropped into grass or sand. Once I had a stake fly off into the grass when wind ripped tarp out my hands as I was setting it up. I then spent two hours unsuccessfully searching for stake, and yet area to be searched was fairly small.
Use clove hitch to attach guylines to stakes: make two loops, slide loops on top of one another, insert stake through loops. Untie by pulling stake out of loops.
Heavy titanium nail stakes are only stakes I have found that are both adequately light for backpacking but also strong enough for very hard ground which I frequently encounter, which consists of compacted dirt mixed with rock (dry mountains, abandoned roads and trails, some organized campgrounds). These stakes are thick enough that they also work in most other conditions, other than loose sand or snow. Some titanium crook stakes are also strong, but less suitable than nail stakes for pounding with rocks, and easier to lose due to lack of brightly colored pull cord. Under certain conditions, very thick stakes, such as MSR Groundhog or Easton Tubular stakes, have less holding power than nail stakes, due to how they disturb compacted soil. Also, top of Easton Tubular stakes is glued to base and can come unglued when pounded by rocks. (This was a major problem with early version of Easton stakes. Problem has since been largely solved by using better glue, but I still don't trust these stakes.) Some hikers bring a single titanium nail stake for boring holes in hard ground, then insert lightweight titanium wire or carbon fiber stakes into these holes, so as to save weight. My experience is that using separate hole boring stake is a nuisance and not justified by weight savings.
As noted, nail stakes do not hold well in loose sand or snow. I don't anticipate camping in deep snow, but I do frequently encounter loose sand on desert bike tours, and so bring along sand stakes in addition to nail stakes. If I happen to encounter loose sand on trips where the only stakes I'm carrying are nail stakes, then possible to get better holding power by laying nail stake horizontally, under a few inches of sand, and with heavy rock on top. Avoid having guyline touch rock, since this will cause abrasion if there is wind during night so that guyline moves back and forth in sawing motion against rock. Pine forests sometimes have deep sandy soil but no heavy rocks. Such forests usually have dead branches lying about which can be used to improvise thick stakes. These thick stakes should hold adequately, given typical lack of strong winds in these forests.