Thorn Nomad MK2 2012 Touring Bicycle
All content copyright © 2010-2026 Frank Revelo, www.frankrevelo.com, United States copyright office registration number TX-7931345
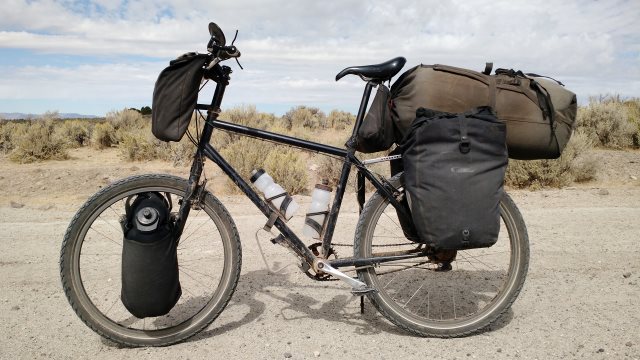
23 liters water, 10 kg food, 9 kg camping gear/clothes/electronics, 3 kg bicycle repair/maintenance gear, thus 45 kg load (not including weight of panniers or racks)
Planning
This was the second bicycle I bought. While the Novara, which was the first bicycle I bought (see here), performed very well on my initial tour, it had been my intention from the start to use that bicycle merely as a learning experience, and then buy a dream bicycle. Based on my experiences on that first tour and internet investigation, I decided a Rohloff hub would be a worthwhile investment, to eliminate shifting problems due to the derailleur mechanism getting clogged with grit, otherwise reduce maintenance, produce a stronger wheel, and allow for changing gears while stalled. The big downside of Rohloff is that cannot be easily repaired at local bicycle shops like a derailleur system. On the other hand, based on my investigation, reliability for Rohloff is excellent, so low likelihood of needing repairs.
I briefly considered true fat-tire bicycle (3" or wider tires), such as Surly Pugsley, built around Rohloff hub, so as to enable pedaling through deep sand. But fat-tire bicycles are undergoing rapid design changes right now and all the kinks may not yet have been worked out. There will likely be problems obtaining spare parts and repairs several years in the future, as current designs become obsolete. Very fat tires probably don't do too well on paved roads, and I may be traveling on paved roads some of the time. I don't much care about speed on dirt roads, but on paved roads I want to move quickly, so as to get back to dirt as soon as possible. Finally, bicycle racks on buses typically don't accomodate very fat tires (letting some air out might be a workaround).
Rohloff issues
Below are some of the problems I read about or considered with Rohloff hubs.
Some hubs have manufacturing defects with internal shim or bearings which don't show up until after about 100 miles of use. From Thorn's Living with Rohloff brochure: "Very occasionally, a new hub rapidly becomes difficult to change between 3 and 4 and/or 10 and 11, even more occasionally, this can be accompanied by slipping in these gears, sometimes a small foreign particle is the culprit, it can be flushed out and the hub's oil replaced, but usually the wheel has to go back to Rohloff; who return the wheel inside one week, after they have re-shimmed it. The problem has never been reported to arise a second time. As this malfunction has almost never been reported on anything other than very low mileage hubs, it shows that there must have been an error, in deciding which shims are required, when the hub is assembled, which can't be detected until the hub is built into a wheel and comes under operational load." Worst case, if something like this happens and isn't detected during shakedown rides, the hub is still usable in the remaining gears, and so wouldn't leave me stranded in the middle of the desert.
Hub flange can break (see photos of such failures here and here). According to Rohloff service manual (available on their website), this is primarily caused by spokes with wrong diameter at elbow bend next to flange, wrong shaped elbow bend, wrong tension, wrong lacing pattern. Broken flanges are supposedly rare for hubs on normal bicycles (i.e. not tandems) where wheels are built exactly according to Rohloff's instructions. Rohloff recommends Sapim double-butted 2.0mm-1.8mm-2.0mm spokes, and that is what Thorn uses in their wheels.
Thorn's Living with Rohloff brochure mentions another possible cause of flange breakage: "Rohloff say that this is due to undetectable flaws, in the alloy billet, prior to manufacture". Someone using name "pq" on lonelyplanet forum wrote: "It's because Rohloff don't want to spend the money on casting the hub shells, so they CNC machine them out of alu billet. Machined hubs are much weaker than cast ones, and particularly prone to cracking."
Spokes can break at nipple, due to mismatch between Rohloff hub and rim, as Thorn's Living with Rohloff brochure explains: "flanges of the Rohloff hub are so wide that, with most rims, the spokes tend to bend as they leave the nipple, eventually this causes them to break at the nipple...We solved the problem...we now have rims drilled so that the spokes leave the rim in a perfectly straight line". Rohloff manual specifically recommends Ryde diagonally drilled rims that Thorn uses.
Thorn's Living with Rohloff brochure reports bad batch of Sapim spokes in Spring 2011, that was causing multiple broken spokes. They don't say what they mean by "bad", whether wrong size or shape, or defect in steel.
There are also internet reports of very rare bearing failures, which take about 10,000km to manifest. Supposedly, hub can still be ridden if this happens. Once back home, hub will have to be returned to Rohloff service center for repair. Example of such a failure here: "How's the Rohloff rolling these days?...you might wonder. Wobble I do, on a possible warn bearing, through Kashmir, Manali to Leh highway and Spiti Valley of N. India. My Rohloff began wobbling in the Taklamakan desert, China with increasing retaliation about 4000km ago, instead of rolling with the same steady flawless confidence it has always shown. I contacted Rohloff, a company notorious for great service and support of bicycle tourists like me on the road. True to form, Rohloff responded immediately and will be replacing the bearing and warn sprocket at no cost, a 2 day repair plus shipping. Rohloff's sturdy internal 14 gear system and longevity means the wheel wobble will not prevent me from pedaling forward through Pakistan, Iran and closer to Europe, where the entire wheel will be shipped back to Germany for the repair at no cost under an amazing lifetime warranty. I have met cycle tourists who over the course of a 4 year continuous bicycle tour had to replace their cassette, derailleur and entire gear unit not once but 3 times. Sure my wheel at the start costs a little more but after all this time of flawless gears while pedaling, one repair at the cost of 38 euros for shipping seems like quite the bargain. Rohloff or Roll on, you decide."
Discussion here: "After some heavy days of cycling steep hills I noticed that while on descents or flat ground that it would slip while pedaling. I initially thought it was because I had ground my rear cog into a sharp throwing star, neglecting to change it (and also trying to see how far I could go with the original cog), and went through trauma when trying to remove the old cog to replace ending up damaging the specialized removal tool, shearing off exterior parts of the hub in the process. I ended up changing the rear cog, flipping the front chainring, changing the oil, and replacing the chain, only to find 10km later the problem persisted. Rohloff stands behind their products and drop shipped a new gear assembly along with a new removal tool which I had to replace on my own once I arrived in Lusaka, Zambia. 25,000km some odd kilometers shouldn't have caused this problem to the hub as there have been other long distance cyclists who have traveled much more distance on these hubs with no problems, and I'll be careful to watch how it functions in the future."
Discussion here: "Part of the shell cracked spontaneously - a fault that allegedly occurs in around one in five thousand hubs. True to form Rohloff and Santos posted a fully built wheel and hub for free to Khartoum within a week so whilst it was frustrating that this problem occurred in the first place, the customer service was exemplary." Thorn guarantees similar replacement service in event of hub problems.
Guarantees make economic sense assuming Rohloff hubs really are reliable. Suppose 1% of hubs have problems (and 1% is probably much higher than actual percentage, based on my research), and cost of new wheel and hub, including shipping to someplace remote like Khartoum, is $2000. Then $20 added to price will accommodate the service guarantee. $20 can easily be buried in $4000+ total cost of the Nomad. Rohloff offers guarantee for hub alone, for those who build their own wheels rather than going through a bicycle builder like Thorn or Santos. Rohloff hub alone costs like $1500, so again, provided hubs really are reliable, cost of guarantee represents small fraction of total cost. So these guarantees aren't unrealistic.
Discussion here: "The bad news – Departing with great Gusto from Mongu earlier on this week I noticed halfway throughout the day some resistance when changing gears. After a bit of wrenching on the shifter it seized entirely. Uh oh! I took the assembly off and noted that the cable assembly was broken – rendering my ability to shift up and down with my hand impossible. I can change the gears with a spanner manually, so this helps a bit, but close to impossible when you are trying to effectively shift on ascents or descents to keep your cadence. Because of this I’ve been in the middle gear (7) and now single speeding it." He elaborated on this failure in some facebook posts. Twist shifter on handlebar is what broke and will have to be replaced, but that requires special order from Europe since no distributor in Africa stocks such items. Rohloff hub itself was unaffected, but shifting requires using wrench at hub, which is a nuisance. I suggested cutting off cable housing near shifter, then attaching bolts or other objects to cables, and then pulling cables that way to shift. Couldn't shift while riding like this, but easier than using wrench at hub. To put this failure into perspective, this is the same bicyclist who sheared off external parts of hub while attempting to replace "cog" (see above, sprocket is usual term for what he calls "cog"), and he has damaged countless other pieces of equipment as documented on his blog (including some spoke breakages about same time he broke the shifter), and he has wrecked his bodily health numerous times (several cases of malaria, plus complication of malaria known as Blackwater fever; yanked out a tooth once doing some sort of repair to his gear; damaged his testicles due to excessive hours riding on a stretched Brooks saddle, to the point of planning to have one or both of his testicles cut off to stop the pain; etc), plus he apparently had some psychological issues growing up (his memoirs of those times for sale on Amazon).
Possible to strip threads of tiny oil drain screw if not careful.
If hub is submersed, water may get inside. Multiple oil changes may be required to flush all the water out. If water is not flushed out prompty, rust may set in and hub may need to be returned to Rohloff service center for overhaul. On his website, Herr Rohloff writes of how he was inspired by experiences riding derailleur-equiped bicycle on the beach (derailleur became clogged with sand as waves rolled over mechanism), and how Rohloff hub works fine in these conditions. So evidently, Rohloff hub isn't particularly vulnerable to water, not even salt water. Then again, Herr Rohloff has ready access to Rohloff service center.
Rubber shifter handle wears out over time. Easy to replace.
Bottom line: while I don't like idea of being dependent on hard-to-source one-of-a-kind gear subject to problems like those just listed, there is also much to be said for reduced maintenance of Rohloff system, assuming it can be made to work. Spoke problems can be avoided by proper spoke and rim selection and proper wheelbuilding. Manufacturing problems might require sending wheel to Rohloff for servicing, but once necessary repairs have been made, hub should then work reliably for 100,000+ miles (assuming I don't foolishly ride through streams or otherwise submerse hub in water), at least according to what I've read on the internet. In other words, in addition to making an investment of money in buying Rohloff hub, I might also have to make an investment of time getting hub to work properly. But over 20+ years I expect to use the hub, both these investments should eventually pay off.
Final decision
I finally decided on Thorn Nomad MK2 expedition touring bicycle, which uses a Rohloff hub and which is specifically designed for combination of paved and rugged dirt roads, which is more or less the sort of touring I plan to do. Options that gave me most difficulty were as follows:
Sizing: 590M geometry was similar to that of my Novara frame, which fit me well, and this is also size recommended by Thorn for someone my height (71", 181 cm) who prefers a shorter, more relaxed riding position. 565L size (recommended by Thorn for someone my height who prefers longer, sportier riding position) might also work, with short stem and extra spacers between stem and headset.
Handlebars: I chose 640mm wide flat track bars instead of 645mm wide MTB comfort bars even though the Novara bars more closely resemble latter. However, since I plan to retain full width of flat track bars, and since they pull back by 10°, position of grips should be similar to that with MTB comfort bars. Also, this is easy option to change.
Steerer: I used same handlebar height as on Novara, but added 50mm just in case I want to raise handlebars later. [Update: As it turns out, I did want to raise handlebars, by exactly 50mm. If I were ordering again, I would specify uncut steerer and have steerer cut down, if necessary, by local bicycle shop. Easy to reduce length of steerer, impossible to increase it.]
Dynohub: Retrofitting would require rebuilding front wheel, so important to make right decision. In my case, decision was to do without, so as to save money, weight, complexity and hassles getting bearings serviced when they wear out. (Schmidt SON dynohub bearings are supposedly very durable, but only Schmidt can service hub and Schmidt factory is in Germany.) I don't ever plan to travel frequently in darkness, so no need for powering head and tail lights, which is main reason people want dynohubs. And even if I do someday need power for head and tail lights, Nomad fork includes attachment point for bottle generator, such as those sold by Peter White Cycles. Bottle generators are less efficient and provide less power than dynohubs when in use, but they are more efficient when not in use (zero drag versus minimal drag), weigh less, cost less, and are easier to replace in case of problems. Other use of dynohub is for charging electronics, using converter of some sort. Only device I carry that needs frequent charging is my smartphone. Power packs (see smartphone page for details) is simpler solution than dynohub/converter for keeping smartphone charged between town stops, plus less weight, less expense and easier to replace in case of problems.
Mudguard: After much thought, I decided not to include SKS P65 chromoplastic mudguards on my initial order. Later, I changed my mind and so installed these mudguards myself, and so learned by personal experience how difficult initial install is. Removal/install after initial install is much easier. Mudguards are bad idea while touring on dirt roads, since they collect mud, but they can be very useful for paved roads. Thorn brochure recommends thinner mudguards than P65 model for use with thin tires, for appearance rather than functional reasons. I find Schwalbe Mondial 55-559 fat tires fast enough for me on paved roads, while giving option of going onto dirt (at least dry dirt), and so I would be unlikely to use thinner tires. Also, even if I did use thinner tires, appearance isn't that important to me. So I see no reason for getting thinner mudguards. If ordering again, I would have Thorn do initial install of SKS P65 mudguards, which I would then remove for dirt road touring. Front mudguard alone weighs about 250g, after trimming stays and drilling out front bracket, which is not required because Nomad has mudguard attachment bolts under fork crown. Rear mudguard weighs about 300g, after trimming stays.
Schrader vs Presta
There was never any doubt in my mind that I wanted rims drilled for Schrader valves. However, because Thorn's ordering brochure (as of July 2015) is so negative about Schrader, it's worth discussing this issue at length, in case anyone reading this page is contemplating buying a Nomad. According to Dave Whittle, Andy Blance did a test and found that inflating tubes was much more difficult with Schrader valves, when using handpumps, due to bad seal between pump and valve. I suspect problem is he used a junk pump in his test, Topeak Mountain Morph in particular, which he raves about ("superb piece of kit"). My first pump was a Topeak Mini Morph (170g), which is similar to the Mountain Morph. Seal to Schrader valves was indeed bad with this pump. Pump was also clumsy to use and eventually t-bar or something else on the pump broke, I forget exactly. I ended up throwing the pump in the trash. Replacement was a Lezyne Pressure Drive handpump (90g for smaller model). Tube on the Lezyne pump screws onto Schrader valve and so seal is perfect (other end of tube screws onto Presta, so seals with Presta are also perfect), plus Lezyne pump is much less clumsy to use. True, Lezyne pump does take a while to pump up a 55-559 tube to 45psi (max pressure I would use), but I'm in no rush while touring plus I very seldom need to pump up tires anymore, now that I've licked the goathead problem by using Stans sealant. Why does Andy Blance need a pump like the Mountain Morph that, in his words, "quickly reaches required pressure"? Probably because he is constantly fixing flats at the side of the road and the slowness of the Lezyne pump gets old fast under those conditions.
Because I was paranoid about pumps failing in the field, I bought two of these Lezyne Pressure Drive pumps, plus a set of replacement o-rings (from SJSCycles). These two pumps fit easily into my saddle bag. In other words, for little more than the weight of the Topeak Mini Morph, I have two very reliable and easy-to-use pumps which both make a perfect seal with Schrader valves, plus a repair kit for the one part of these pumps that might possibly fail someday. If you are buying a $4000+ bicycle, you can afford to buy a decent handpump (or two) at the same time. So we can dismiss this argument that handpumps don't work well with Schrader. (Topeak has a number of pumps on their website which appear similar in design to the Lezyne Pressure Drive, though there may be differences not apparent from the photos.)
Primary reason for going with Schrader, contrary to what Thorn's brochure says, is NOT because Schrader tubes are more widely available in many parts of the world (though that is true), but rather because it is easier to add sealant to tubes with Schrader valves. According to Dave Whittle, Andy Blance tried sealant and didn't much care for it because it didn't work properly and affected handling. Probably he tested with junk sealant, same as he tested with junk pumps, and thus drew the wrong conclusion. I use Stans myself, though I'm sure there are other good sealants (for example, I have heard good things about TrueGoo). Most commonly available sealant where I live as of 2011 (Reno, Nevada, in the west of the United States) is Slime. In my tests, Slime did not work. Slime also weighs a lot more than Stans (190g vs 60g per tube). Use the right sealant and you don't have problems.
Sealant is required in areas infested with goathead thorns, unless you have an extremely high tolerance for fixing flats, and most cyclists don't. (You could also use a solution much worse than sealant, like ultra-thick thorn tubes or even solid rubber "tubes"—the fact that such junk is even sold is proof that people in goathead territory are desperate for a solution.) Typical first question I get from people curious about my touring is "Do you get a lot of flats?" That question reflects these people's experience as children riding bicycles in the western United States, back in the days before there were good sealants. I am not exaggerating when I say it is easy to get 50 punctures/day in goathead territory if you are riding without sealant in your tires and happen to run across a nest of goatheads. Are you carrying 50 patches? Maybe you had two spare tubes and so can simply replace the tubes rather than patching them. What if you then encounter more goatheads? Don't take my word for it, search on the internet for what other people have to say about goatheads. "These things suck all the joy out of cycling" is a typical quote.
Andy Blance points out that you can always have rims drilled for Schrader later, if you find Presta isn't working for you. Yes, you could, but one of the reasons for buying a ready-made Rohloff-equipped bicycle like the Nomad rather than cobbling together your own system is to take advantage of the designer/builder's judgment as to what works and what doesn't under real-life conditions. Being forced to redrill for Schrader implies Andy Blance's judgment is poor, which makes you wonder if the whole bicycle is poorly thought-out. Fortunately for me and other Nomad owners, this Schrader-Presta issue is the only place where Andy Blance's judgment is wrong. (I say this based on over 20,000 km of bicycle touring on rugged dirt roads with my Nomad thus far.) Reason his judgment is wrong here is that he evidently has no experience with goathead thorns. Similar to how know-nothings in various bicycle forums pooh-pooh the goathead issue. Invariably, it turns out these know-nothings live in areas where there are no goatheads. You really have to experience these goatheads in person to appreciate what a menace they are (though photos you can find on the internet might help with understanding the issue).
For more on flat prevention in goathead territory, see here. If you are touring strictly in Britain and elsewhere in northern Europe, this is a non-issue, since there are no goatheads in those areas (at least not that I'm aware of). But if you plan on possibly touring in goathead infested regions, including the western United States (plus parts of Africa, the Mediterranean area and Australia, if I'm not mistaken), then I strongly recommend you ignore Andy Blance's advice and take mine instead: get your rims drilled for Schrader. Also, buy a handpump like the Lezyne Pressure Drive that works properly with Schrader valves. There are no downsides to using Schrader rather than Presta if you later decide not to tour in goathead infested areas, at least with very sturdy rims like the Andra 30. (With weak rims, such as on a road bicycle, the smaller Presta hole might be an advantage. Also, sealant won't work with high-pressure tires, so no reason to go with Schrader on road bicycles.)
Obsolete options
Back when I ordered my Nomad MK2, there were various additional options which have since been removed from the ordering brochure, though you could ask to have them installed as a custom option. I tried two of these additional options, and rejected them both:
Mr Crud CrudCatcher, 2009 edition (here): After running with this several tours, I concluded the crud catcher was unnecessary and removed it: (a) I normally am so filthy while touring that a little extra dirt and water isn't going to make any difference; (b) I normally go slow enough that the mud and water flung up by the front tire doesn't even get past the down tube much less hit my upper body. Those touring in wet conditions and going fast, and who aren't already filthy and so do care about getting wet from tire spray, are probably touring on paved roads, in which case mudguards are better option than the crud catcher. Bottom line, I don't think the crud catcher idea is good for anyone and so don't recommend it. Weighs 75g.
Thorn chainguard (here or here): A few years after buying my Nomad MK2, I installed the 38T chainguard, then removed it almost immediately when I decided I didn't like it. What I found was that the chainguard simply doesn't really add much protection from grease. Partly this was because the chainguard I tested with was only slightly larger diameter than the chainring (I was running 36T at the time), but the 44T chainguard probably wouldn't be much better. Also, my chain is no longer so greasy as it was initially, now that I've developed a system for cleaning it before relubing, so protection from grease is no longer so important. Also, I've developed muscle memory so I don't touch the chain so much with my legs anymore. Chainguard might help protect chain and chainring from being bashed on rocks ("bashring"), but then again, my Surly chainring is stainless steel whereas chainguard is aluminum, so it's possible chainguard would be weaker than chainring, and thus become a source of trouble itself if it got bent. Also, narrow space between chainring and chainguard could cause chain to get stuck when it falls off chainring, this space could get clogged with hard to remove dirt, and chainguard impedes cleaning chain and chainring. Finally, chainguard adds some weight (85g for 38T chainguard itself, plus a few more grams for longer chainring nuts and wider bottom bracket). Note that it is necessary to install a wider bottom bracket to allow installing chainguard while still maintaining proper chainline for chainring. Wider bottom bracket increases Q factor (distance of pedals from frame), which some bicyclists dislike. According to Dave Whittle of Thorn, less than 1% of Nomad MK2 buyers selected chainguard option, back when it was still offered in ordering brochure. Also, Andy Blance (who designed the chainguard) never had a high opinion of it: "protects trouser legs, or simply adds weight? you decide" was blurb beside chainguard option in old ordering brochure. In other words, almost no one seems to think highly of this chainguard.

Final bicycle specs (including items added/changed after initial build)
- Frame
- Thorn Nomad MK2, size 590M, black (Reynolds 969 steel, 31.8mm (OD) top and seat tubes, 34.9mm down tube, 19mm seat stays)
- Fork
- Thorn rigid steel fork
- Headset
- FSA Orbit XLII threadless headset
- Rear hub
- Rohloff Speedhub 500/14 OEM CC/DB, 32h, black, ser# 153079
- Front hub
- Hope Pro3, 32h, black
- Bottom bracket
- Shimano UN55 73x110mm sealed cartridge, english thread
- Splined sprocket
- Rohloff, steel, 19 tooth (original order was for screw-on sprocket, but I replaced this later with slim version sprocket carrier and splined sprocket)
- Chainring
- Surly 110bcd 5arm reversible stainless steel single ring, 40 tooth (original order was for 42/17 gearing, but I replaced this later with 36/17, then replaced again with 40/19)
- Crank bolts
- Shimano type chromed 8 mm allen key
- Cranks
- Thorn 175mm 110bcd 5arm cranks for 73mm shell
- Chain
- SRAM 3/32 Inch PC830 114 Links 7/8 Speed HG Compatible
- Skewers
- Titanium quick release (100mm outer-lock-nut front, 135mm OLN rear), black
- Rims
- Ryde (used to be Rigida) Andra 30 CSS 26" (559x19), black, 32h, rear rim drilled for Rohloff hub, (735g/rim), 24mm outer width, suitable for tire widths 28-62mm, drilled for Schrader valves
- Spokes
- Sapim stainless-steel Race-series double-butted (2.0mm/1.8mm/2.0mm), 238mm rear, 264mm front, 14mm x 2mm nickle-plated brass Sapim nipples, 3.23mm spoke wrench required
- Rim tape
- Thorn reinforced nylon rim tape, 26" (559) x 22 mm
- Tires
- Schwalbe Marathon Mondial HS428 folding, 26" x 2.15" (55-559)
- Tubes
- Schwalbe av13 schrader tube, 26" (40-559 to 62-559)
- Brakes
- Shimano Deore M590 V-brakes with BL-M591 brake levers, black
- Brake pads
- Swissstop blue, for ceramic & carbide CSS rims
- Saddle
- Selle SMP Lite 209 steel rails and black leather outer layer (original order was for Brooks B17 standard, black with black steel rails, which was comfortable but which I replaced due to concern about long-term damage to my genital area, first with Selle SMP TRK Medium with vinyl outer layer, then with Selle SMP Lite 209)
- Seatpost
- Thorn micro-adjustable black 27.2mm outer diameter, plus shim for fitting in 29.8mm internal diameter seat tube
- Pedals
- Shimano PD-GR500 double-sided BMX platform pedals (originally PD-MX30, later replaced by PD-MX80, then by PD-GR500)
- Stem
- 1 1/8 Ahead, Kalloy AS-009 UNO, 25.4mm clamp, 75mm x 35°
- Handlebar
- Thorn flat track, 25.4mm clamp, black
- Grips
- Ergon GP1-L anatomic, large, black
- Rear rack
- Thorn Expedition, cro-mo steel, black (850g)
- Front rack
- Thorn MkV Low Loader, cro-mo steel, black (560g)
- Accessory bars
- 2 x Thorn 105mm x 0° (110g each), for supporting handlebar bag
- Spares/tools
- Rohloff sprocket removal tool
- Spares/tools
- 3 spare rear spokes, 3 spare front spokes, all with nipples
- Size
- 590M (for riders 1740 to 1880mm, I am 1800mm)
- Seat Tube Center-Center
- 445mm
- Effective top tube
- 585mm (Novara was 597mm)
- Mid-tube standover
- 800mm (my standover height, wearing boots, is 900mm)
- Front-tube standover
- 865mm
- Chain stay length
- 466mm (Novara was 432mm)
- Seat tube angle
- 73° (Novara was 72.5°)
- Head tube angle*
- 71° (Novara was 70°)
- Fork offset*
- 48mm (Novara, which had suspension forks, was 41mm)
- Trail*
- 63mm
- Wheelbase*
- 1135mm
* indicates geometry information from review of older Nomad model, since I couldn't find a source for this geometry information for the Nomad MK2.
Ordering process and costs
I placed order with Thorn on Dec 22, 2011 and paid a £100 deposit. However, Thorn was closed next week for Christmas holidays and so couldn't begin building bicycle until Jan 3. Bicycle was finished on Jan 16 and I paid balance due on Jan 17. Bicycle was delivered Feb 6, 2012, after about week of delay due to incorrect phone number on invoice.
VAT is not charged for American customers, however there are other charges for international orders. Thorn offered two shipping options: £440 for tracked shipping in one box by Tuffnells, or £190 for untracked shipping in two boxes by Parcel Force. Thorn recommended Tuffnells option and I went with that recommendation. (I've read too many horror stories about bicycles damaged by delivery services. I don't mind money risks, but risk of frustration and wasted time is another story. Better to pay extra for recommended delivery service.) Visa charged 3% currency conversion fee for payment by credit card. United States customs duties on complete bicycles is 11% (see here, search on bicycle). I was charged this 11% on both bicycle and shipping, rather than bicycle alone. (Note that duties on bicycle parts is 0%, so no hassle with duties on future orders for repair items.)
I originally listed total price here, but that price was misleading, since bicycle specs shown above are different from what I initially ordered, my order included some spares not shown in above list, some parts I bought from US distributors and finally $/£ exchange rate has changed. Current prices are on Thorn website. Total out-of-pocket was over $4500. Compare with about $800 for Novara, after replacing tires and saddle and adding rear rack, mirror, computer and bell. Of course, Novara could really stand for other upgrades as well (rigid fork to replace suspension fork which is nuisance, decent pedals to replace plastic pedals which are already falling apart, etc) and will soon require maintenance to drive train, plus wheels are much less solid than those on Nomad, Novara doesn't have front rack, etc. I think Nomad is fairly-priced, all things considered. Also, even expensive touring bicycle is cheap compared to RVs and other forms of travel, though more expensive than hiking.
Initial comments
Rather than excitement upon receiving brand-new bicycle, my initial feeling was one of sadness at abandoning tried and trusty Novara in favor of something which is all talk and no action thus far, mixed with dread at potential of Rohloff hub for causing problems. However, given heavy loads I plan to carry, I probably would have eventually been forced to replace Novara. Better to make change now and get it over with it, than leave it dangling like sword of Damocles over all my future plans. This purchase is basically an act of faith in the judgment of Andy Blance (Thorn's designer and the author of Nomad sales brochure and Thorn Living with Rohloff brochure) as to how to carry heavy loads on rugged dirt roads by bicycle.
Front cartridge brakes were reversed from correct orientation. I sent an email with photo to Thorn. They confirmed that orientation was wrong and brakes needed to be reversed. While reversing brakes, I dropped washers and they got lost on floor. It took me two hours of searching to find them again. I consider this incident a blessing in disguise, because it makes me cognizant of danger of something like this happening in the middle of the desert. Given how hard it was to find these light grey washers in my apartment, it might be impossible to find them amidst similar-colored rocks and sand outdoors. There should be no need to disassemble brakes in the desert, of course. But who knows? Brakes might get clogged with grit so that I'm tempted to disassemble to clean them out. This incident in my apartment shows clearly the danger of such a procedure. Add to my list of rules: "assume I will lose any small parts I work with in the field, so either carry spares for small parts I must handle (such as Schrader valve cores, which must be removed to fill tubes with sealant), or avoid field procedures involving small parts".
Spoke lacing doesn't match that specified by Rohloff. In particular, trailing spokes have head facing inwards rather than outwards (equivalent to saying pulling spokes do not cross flange), whereas all photos in Thorn's brochures show wheels built according to Rohloff's specifications. Thorn's response was that they are more interested in practice than theory and have confidence in their wheelbuilder. But that doesn't explain difference between my wheel and wheels in Thorn's brochures. I'm not particularly concerned about discrepancy, since I'm pretty sure Nomad's wheels are far stronger than those on Novara (which also did not run pulling spokes over flange), mainly due to lack of dishing, but also due to better spokes, better rim and higher spoke tension. Also, I too am more interested in practice than theory.
Bottom bracket height from ground is less than on Novara (29cm vs 31cm). This is probably good, since it makes it easier to put my toes on the ground when saddle is raised to proper level. Down side of lower bottom bracket is greater likelihood of hitting objects underneath, and of grounding out pedals while cornering. Since I don't ride aggressively, these negatives are not a concern.
Stem a little on the long side, so I ordered replacment (75mm x 35° versus the original 120mm x 17°) as part of my order for various additions and spares. I prefer fairly upright riding position.
590M seems right size. No toe overlap, unless I install front mudguard, in which case there is slight overlap if I position my feet with middle rather than front of the foot centered on pedal. Also, no heel strike of panniers, even though I moved panniers forwards several notches from where they were on Novara. 565L size would have added 20mm to effective top tube length, and reduced front standover height by 20mm. Longer top tube would eliminate toe overlap even with mudguards, but would cause me to be more stretched out than I prefer, though I could gain back at least half 20mm with shorter stem (current stem is 75mm x 35°). Lower standover height implies I would have truly gigantic stack of spacers between stem and headset. Park Tool Big Blue Book of Bike Repair recommends no more than 40mm between stem and headset (they don't explain reason for this recommendation), whereas I currently have 115mm. With 565L, I'd need something like 135mm between stem and headset, and that's before possibly moving stem up in future if I decide I want handlebars higher.
I ordered Rohloff hub and Hope front hub in black, which requires anodizing, so as to match my overall color scheme of black and more black. However, I later read that anodizing weakens aluminum and last thing I want is weakened flanges on my hubs. Also, there are plenty of other silver elements on bicycle, and these blend fine with black, so silver hubs would also look fine, and standard silver color would have been cheaper. Though perhaps I'm worrying about nothing. Presumably, Rohloff and/or Thorn would not be offering black anodized version if it really did cause significant flange weakness.
55-559 Marathon Mondial tires are clearly sturdier but also slightly less wide than 57-559 Marathon Extremes. Tread pattern is similar and both tires can be installed and removed with bare hands, though single tire lever helps with removal.
6 spare spokes (3 each of front and rear), padded by foam, fit easily into handlebar.
Small size of Rohloff oil drain screw makes me worried about possibility of stripping threads in hub shell when reinstalling it. This would be mess to repair. Supposedly, screw is secured internally with Loctite.
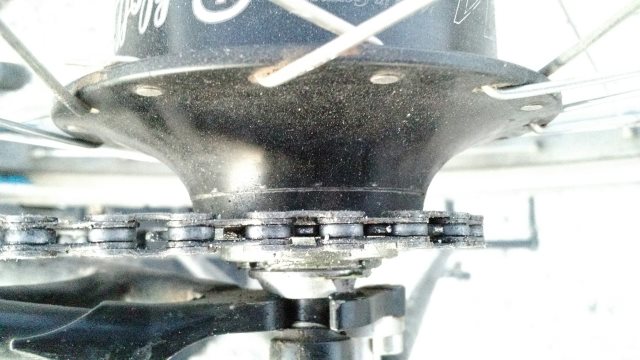
There are lurid tales on the internet regarding difficulty of removing Rohloff sprocket after bicycle has been ridden for a while: muscular young bicycle mechanics straining and swearing and breaking chain whips right and left, etc. I decided to test removing sprocket while bicycle was still brand-new, so as to establish benchmark for how difficult it might be down the road. And indeed, even on brand-new bicycle, removing sprocket is difficult, though mainly due to awkwardness of posture required. I greased sprocket well before reinstalling it. I plan to make a practice of removing, greasing and reinstalling the sprocket at every oil change (every 5000 km), rather than waiting until the sprocket is worn (which might take 15000 km). [Update 2023: replaced screw-on sprocket with splined sprocket, so removal and replacement no longer difficult.]
Some Thorn Nomad owners going on long expeditions have expressed desire for derailleur hanger on Nomad frame, as backup solution in case Rohloff hub or other rear wheel parts break somewhere remote, where it is impossible or unacceptably expensive or time-consuming to get rear wheel repaired, but where standard mountain bicycle wheels can be obtained locally. However, there is no need for derailleur hanger to mount a wheel with derailleur hub. Rather, derailleur hub wheel can be mounted as single-speed wheel, using whichever of cogs gives an acceptable gear ratio and chain line, and using eccentric bottom bracket to take up slack in chain. Then package up broken rear wheel, strap it to rear rack somehow, and continue on with journey, dismounting and pushing whenever hills are encountered. After all, people have ridden around the world on single-speed bicycles.
Customization
Some of items below were transferred from Novara.
- Painted over more garish logos on frame, forks, seatpost and stem. Kept Thorn head badge, which is tasteful, logos on chain stays (modest in size), logo at bottom of the seat tube (very small and inconspicuous, as logos should be).
- Incredibell Brass Duet bell, by Mirrycle. (Thorn included Zefal bell, but it was junk).
- Mountain Bike Mirror, by Mirrycle. 100g.
- Sigma BC509 bicycle computer. Simple and cheap wired computer, with following functions: current time, current speed, distance since last reset, time since last reset, odometer (total distance since installation). Unlike Cateye computer I used on Novara bicycle, Sigma computer allows initializing odometer upon installation, which is useful feature, since odometer is zeroed out when battery goes dead. I looked into wireless computers, but didn't see that they offered any advantages, other than making it easier to remove fork, which I don't plan to do very often. I scraped off sticky foam on computer mount before installing, then attached with zipties rather than supplied o-rings. This allows computer to be rotated around handlebars, to protect it when bicycle is turned upside down to check wheel alignment in field. I had some problems getting correct tire setting so that computer matches distances labelled on local bicycle path. It occurred to me that bicycle path distance might be wrong, and not computer. However, I didn't have such problems with Cateye computer on Novara. I finally settled on circumference of 2100mm with Marathon Mondial 55-559 tires, whereas setup instructions recommend 2114 or 2130 for such tires. 45g. [Update 2014: Computer stopping working when I rode in rain. Evidently, water seeped into contacts between computer and cable. When water dried out, computer resumed working. Based on this experience, I would have to advise wireless computer for people who frequently ride in rain.]
- Handlebar mount for Etrex 20 GPS (described here). 10g.
- Planet Bike blinking LED tail light, supposedly runs 100 hours on 2 AAA batteries. 50g with 2 AAA lithium batteries. Carried in saddle bag when not in use, with batteries stored in plastic bag, to prevent accidentally turning on light and discharging batteries.
- Two Profile Design Cage water bottle holders at 65g each, each capable of holding a 600ml Nalgene ATB bottle (see carrying system).
- Ortlieb Back Roller Plus rear panniers. 40L capacity per pair, 1800g per pair. Comments about and modifications to these panniers here.
- Home-made front panniers. 200g.
- Home-made handlebar bag. 235g.
- Home-made saddle bag, for tools. 120g.
- Home-made rack bag, for sleep pad, quilt, clothes, poles. 605g.
- Home-made brake band, to keep front wheel from moving when parked. 5g.
- Home-made stick-holder, to carry hiking stick against front fork in quick-draw position, for protection from dogs. Stick can also be used to prop up bicycle while doing maintenance. 30g.
Weights
- Bicycle weight: 20 kg, after changes above, assuming all bags and panniers empty.
- Rider weight: 80 kg (77 kg body weight, 3 kg clothing/footwear).
- Base equipment weight: 12 kg (9 kg camping gear/clothes/electronics, 3 kg bicycle repair/maintenance gear).
- Max consumables: 33 kg (10 kg food, 23 liters water, of which 11 liters in rear panniers, 1 liter in front triangle, 11 liters in front panniers).
- Max baggage load: 45 kg (12 + 33), of which about 29 kg on rear rack, 2 kg under saddle, 1 kg in front triangle, 2 kg in handlebar bag, and 11 kg on front rack (69% to rear of or under saddle, 31% forward of saddle). Compare with rated capacity for bicycle of 45 kg, rugged-road capacity for rear rack of 30 kg, rugged-road capacity for front rack of 15 kg.
- Max load including rider: 125 kg (80 + 45).
- Max loaded bicycle weight without rider: 65 kg (20 + 45). Heavy load to push up hills.
Replacement parts
Nomad will eventually require maintenance, and some parts are hard-to-source and might someday be unavailable, so stock up on spares if possible, and have plan otherwise.
- Hope Pro3 front hub bearings are non-standard and only available from British distributors. Order spares.
- FSA Orbit XL II headset will likely need new bearings if I keep bicycle for 20+ years, as planned. More than likely, this model headset will be obsolete at some point, with spare parts no longer available. Order spares now, so as to avoid having to replace headset in its entirety.
- UN55 bottom bracket commonly available, but might as well pick up spare when ordering other items. 73 mm x 110 mm is fairly common size, but not most common size, and so is often out-of-stock.
- Eccentric bottom bracket should last forever, if I don't mess it up somehow, but there's an if there. Might as well order spare as part of any other order from Thorn, since international shipping per order is flat $50 versus $40 for eccentric. And there is also possibility of Thorn being out-of-stock if and when I need replacement.
- Chainring is Thorn-brand, but Surly makes similar single-speed chainrings, so no need to order spares.
- Handlebar, stem, crank, seatpost and seatpost shim are Thorn-brand, but easily replaced by other brands.
- I ordered Rohloff oil change kit and rear sprocket with bicycle. Once these are used, order replacements, so as to always have spares on hand in case distributor is out-of-stock. Perhaps order Rohloff oil in bulk, along with extra drain screws.
- Ryde Andra CSS rims not widely available. Also, there is issue of special drilling for Rohloff hubs for rear rim. I'd prefer somewhat wider rim. However, most of wide rims currently available are for disk brakes and I don't want disk brakes. I'd also prefer either heavier spokes or more spokes. However, heavier spokes with right bend for Rohloff hubs are not currently available. Given all the wheelbuilding rules that must be followed to ensure no damage to Rohloff hub, best to assume that wheels must be built using parts from Thorn, when and if new wheels are needed, and damn expense of international shipping.
- Swisstop blue brake pads are only available from European distributors. I ordered set of spares with bicycle. No point in buying additional spares until I've had a chance to see how long these pads last.
- Schwalbe Mondial tires might be out-of-stock. Best to keep set of spares on hand at all times.
- Schwalbe av13 tubes hard to buy in United States. Order spares whenever buying tires.
- Thorn/SJSCycles is source for otherwise hard-to-find replacement parts for Ortlieb panniers (QL2 upper strap and lower hooks). Add to order for other Thorn parts.
Chain cleaning and adjustment
At least on 590M frame with 40/19 gearing, brand-new chains (8 speed, SRAM PC830 or similar, 57" or 114 half-links initially) should be shortened to 52" (5 full-links removed). This allows about 50% of EBB available for tightening as chain stretches, before needing to remove link.
Tightening grub screws createspermanent indent in eccentric body. If indents are too close together, grub screws will slip. So do not adjust eccentric until necessary, meaning substantial adjustment possible, thus allowing space between indents.
To shorten chain: (a) open at master link, which may be difficult if master link is clogged with dirt, or else break chain next to master link using chain tool; (b) remove two half-links; (c) replace master link. Because shortening chain in field might damage existing master link, include 3 spare master links in repair kit (along with two spare chain links in case chain breaks, though this is very unlikely).
Thorn shipped a pedal/eccentric/mudguard/rohloff wrench with bicycle. However, I found it easy to turn eccentric using handle of my chain tool, and I can manually turn rohloff gear with adjustable wrench, and I don't need to remove pedals or mudguards on tours, so I will leave this wrench behind in future and save 70g of weight.
Unlike with derailleurs, which won't shift properly if l chain is dirty, internal gear hubs like Rohloff work fine with dirty chains. However, it's probably best not to let chain get too dirty. Among other things, very dirty chain means very dirty hands if chain is ever touched (to remove rear wheel, adjust eccentric) or very dirty pants legs. My chain cleaning system consists of two 125ml bottles of Simple Green all-purpose cleaner fluid (available at grocery stores) and two toothbrushes (one of each is spare, since these can break), water bottle. Dip toothbrush in cleaner fluid, run chain backwards against tooth brush, repeat until chain is coated with cleaner. Rinse chain with water bottle. Allow chain to dry. Apply new lube. Toothbrush, bottles of cleaner fluid and bottles of chain lube are all stored inside saddle bag, so leaks will only contaminate bicycle tools.
I use mostly lightweight silicone chain lube (White Lightning Epic Ride). PTFE lubes (TriFlow) are also good and longer-lasting than silicone, however smell of these PTFE lubes is far more unpleasant than smell of silicone lubes, which is consideration if lube bottle leaks or you get lube on hands and don't have access to washing facilities. I found wax lubes to be a mess and they don't work well in low temperatures. Oily lubes just make chain filthy and are not needed in mostly warm and dry conditions that I encounter. As with chain cleaner bottles, lube bottles can break and leak, so best to choose lube that is not too messy and smelly. Also, bring multiple small bottles rather than single large bottle.
Unlike with derailleurs, it is not necessary to replace chains frequently with internal gear hubs. Approach recommended by Andy Blance is to let chainring, chain and sprocket all wear together. Then flip chainring and sprocket and install new chain and let that side of chainring and sprockets wear. Finally, replace chainring, sprocket and chain. This approach works if chainring and sprocket wear at approximately same rate. I use traditional system of replacing chain after each tour, so as to reduce chainring and sprocket wear.
Initial test rides
Nomad performed as expected and left me feeling very good about purchase. Test ride was with 30 kg of gear, but there should be little difficulty with my 45 kg max load.
I had read reviews in which Nomad was described as overbuilt tank, but it feels lighter and faster to me than Novara, which is my only basis for comparison, besides heavy steel single-speeds I grew up riding forty years ago. (I don't think I've ever ridden a truly lightweight bicycle in my life.)
Rohloff hub shifted smoothly and I hardly noticed any noise in upper gears, just pawls clicking when coasting. Lower gears are noisier, but this is minor consideration, since situations requiring lower gears (strugging up hills or over broken terrain) typically distract me enough that I am unlikely to notice gear noises, as long as these noises are normal.
There was much talk in Thorn brochure about ear-splitting squealing noises from Swisstop brakes against carbide rim, length of time before this squealing diminishes, recommendations to minimize squealing, etc. I noticed no squealing whatsoever from brakes. Possibly desert dust on rims eliminates this issue.
Change from suspension fork on Novara to rigid fork on Nomad resulted in better handling but no arm or shoulder soreness. Suspension is overrated. Best suspension is fat tires plus strong muscles so that body actively rises from saddle as bumps are encountered, thus neutralizing shocks rather than passively absorbing them.
Comments after 1st tour (odometer 970 miles, 1561 km)
Mar 2012 - Apr 2012, 24 day, 811 mile (1305 km) tour of Nevada backcountry, described in detail here. I started tour with 43 kilo load and bicycle handled that fine. I also tested riding downhill at 47mph with 30 kilo load, and bicycle handled that fine as well. Rohloff hub was true joy to use. I cannot recommend these Thorn Nomad bicycles highly enough for mixed paved/dirt road touring where heavy loads must be carried.
Rohloff recommends oil change every 3000 miles (5000 km). However, I decided to change oil immediately upon returning from my tour, to see what was involved. Had some difficulty gluing oil change tube to plastic syringe. Superglue doesn't seem to work well, not sure why. Seamgrip urethane glue did successfully secure tube to syringe, and after that, oil change procedure was quick and straightforward, with very little mess. Screw in oil change kit is wrapped with some sort of white tape on threads, which presumably serves to secure screw in place. Regardless, I didn't apply loctite to new screw before installing. I saved old drain screw as spare.
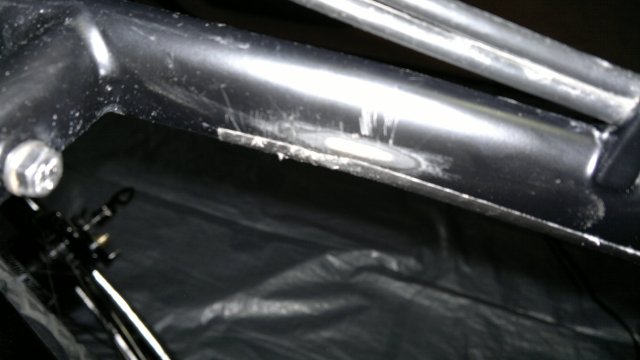
While examining bicycle, I noticed paint had been abraded down to bare metal on insides of both chain stays, right where tires pass. Not sure what this is from, since there is plenty of clearance between chain stays and tires. I sanded and painted these spots with touch-up paint, along with a few other areas where paint had been scratched, probably from rocks thrown up by the tires. [Update: based on discussion on Thorn forums, such abrasion is to be expected with mountain bicycles, and is known issue since 1970's. This is especially true with fat tires like the 55-559 Mondials, which have little clearance between tire and chainstays. Mud sticks to sides of tires, is carried around, then rubs off on chainstays, abrading paint. I encountered mud several times on this just-completed tour.]
I did nothing to soften or otherwise break-in Brooks saddle, other than smearing underside liberally with Proofhide when I first received bicycle. Nevertheless, saddle was comfortable from beginning. There are now barely visible impressions of my sit bones just in front of rear flange, but the saddle surface remains quite hard. I think real breaking-in with Brooks saddle is body of cyclist. In particular, skin under sitbones needs to adapt so that it doesn't produce pimples or other inflammation. Desk chairs I've sat on for many hours/day for many years now (folding metal chair with thin cushion or wooden chair without cushion) are at least as hard as Brooks saddle, and I tend to sit upright mostly, so skin under my sitbones has long been adapted to hard surfaces.
I'm comfortable with 640mm wide Thorn flat-track handlebars myself, but just barely. Someone significantly taller than me (I'm 181 cm tall) or with broader shoulders might want something slightly wider. I think these handlebars should be made 680mm wide and then let user cut them down if so desired.
Comments after 2nd tour (odometer 2080 miles, 3347 km)
Aug 2012, 30 day, 1040 mile (1673 km) tour of Lassen and Plumas national forest, described in detail here.
Replaced nylon rim strip with cloth rim strip. Nylon rim strip shifted position, so that hard edge starting cutting into inner tube and eventually sliced it open. Initially, I replaced with cheap rubber rim strips, which are okay for low pressures I run (nylon or cloth is required for high-pressure tires). Then I read some rumors on internet that rubber rim strips can break. Rubber rim strips didn't seem fragile to me, but it seemed penny-wise pound-foolish not spend $5 for cloth rim strips, which everyone seems to agree are best. Cloth rim strips even weigh slightly less (22 grams versus 32 grams for rubber). [Update: Andy Blance had problems with glue on Velox cloth rim strips melting in hot climates, allowing rim strip to shift position, ultimately resulting in flats from tube rubbing uncovered spoke nipples. I also experienced such slipping (see here), though not to extent of uncovering spoke nipples. I will be returned to nylon rim strips in the future.]
Performed another oil change on Rohloff hub before this tour. As with first oil change, this one was well before schedule, which is every 3000 miles rather than every 1000 miles. However, it can't hurt to change oil more frequently than recommended and these oil changes are not expensive, give that I ordered Rohloff oil in bulk from Thorn. Also, I want to get thoroughly familiar with procedure. I continue to worry about somehow stripping drain screw threads.
Replaced Finish Line Dry teflon lube with White Lightning Epic Ride silicone lube as chain lube, mainly because latter is more widely available and I dislike mixing lubes. I briefly tried White Lightning Clean Ride wax lube, but this becomes very viscous when cold and probably won't work well then, and I need something that works in both warm and cold conditions. Also, though I try to avoid wet weather as much as possible, there will times when I can't avoid wetness and wax lubes don't work well in wet conditions. For all these reasons, Epic Ride is probably better for me. What definitely is a no-go is Prolink Gold that I used on my first two tours, since bottle for that lube leaks from changes in atmospheric pressure due to changes in altitude. Both Finish Line Dry and Epic Ride have secure caps on their bottles.
Given that I'm running an internal gear hub, I can afford to abuse chain far more than people running derailleurs. However, chain still needs to be cleaned occasionally when traveling in dusty conditions, or else it will cause horrible grinding noises. What I discovered on this last tour is that simply dumping more lube on top of dirty chain, which was my original plan, doesn't work to stop squeaking, at least with lightweight teflon and silicone lubes. (See above for chain cleaning system.)
Experimented with running tubes without sealant, hoping not to encounter any goatheads, but experiment was failure. Goatheads are everywhere in dry parts of western United States and sealant is mandatory.
Still unsure as to what sorts of spares I should be carrying. I'm probably carrying too much, but then better safe than sorry. A few pounds of extra weight hardly makes a difference on a bicycle. Big change from backpacking, where every ounce counts.
Comments after 3rd tour (odometer 3726 miles, 5595 km)
Sep 2012 - Oct 2012, 37 day, 1611 mile (2592 km) tour of Nevada and Utah backcountry, including Nevada portion of the American Discovery Trail, described in detail here.
Checked spoke tension with my Park TM-1 spoke tension meter. One spoke was slightly loose relative to others, though not absolutely loose, so I tightened it a bit. Wheels are both still true. Spoke tensions are very high, average over 131 Kg. But that is how Thorn built the wheel and I suppose they know what they are doing. Rohloff guide is unclear as to max spoke tension, though they warn against low tension, which can cause hub flange to break due to flexing.
I kept 55-559 Schwalbe Mondials inflated to 42 PSI (3.0 bars) typically, and that worked well enough on all surfaces: paved roads, gravel, hardpack dirt, sand.
Replaced both brake cables, to get experience with this.
Experimented with cutting brake/shifter cables with Leatherman tool from field repair kit. Totally ineffective. Mangles cable without cutting it. So I pre-cut front and rear brake cables to proper length using cable cutters, then superglued ends to stop fraying, then stored in repair kit, using home-made cable holder to protect other items from sharp cable ends.
I wanted to also pre-cut shifter cables. However, according to Dave Whittle of Thorn, new Rohloff twistshifter, which is what I have, requires Rohloff or Fibrax shifter cables, as head on Shimano and similar shifter cables is too large and will damage plastic drum in the twistshifter. [Update: according to another bicycle tourist, head on Shimano cables can be reduced in size using file or sandpaper so that it fits properly into Rohloff twistshifter.] Only place to get these cables is from Thorn. I'll order in bulk when I return from my next tour. Specific cable he recommends here. He also says any 5mm outer brake housing will work, but be very sure NOT to lubricate the cables and to fit sealed ferrules, such as these. Other part of the Rohloff system that is likely to need replacing is rubber shifter handle.
Some people on Thorn forums have high praise for Hebie chainglider. Some issues: (a) if chainglider is so great, why doesn't Andy Blance use it on his expeditions? (b) people praising chainglider use it mostly on roads, for commuting and short tours, so I'm not confident of their assurances that chainglider doesn't let in dust; (c) requires use of thinner Surly steel chainring rather than thicker Thorn aluminum chainring; (d) more weight (about 300g, according to something I read on internet) though this would be partially compensated for by less chain cleaner and chain lube in repair kit; (e) early version damaged Rohloff hub shell, though apparently that problem has been fixed; (f) makes removing rear wheel (to fix flats) somewhat more difficult, though this is not enough to dissuade me from chainglider if it actually did protect chain from dirt.
Comments after 4th tour (odometer 5278 miles, 8492 km)
Nov 2012 - Jan 2013, 55 day, 1477 mile (2376 km) tour of the Mojave Desert, described in detail here.
Big news is that Rohloff has authorized use of lower gear ratios, so I'll be switching to 36/17, giving me a low gear of 15.4 gear inches. Thorn is selling a 19T sprocket Thorn for same price as 17T Rohloff sprocket. 40/19 has similar gears to 36/17, but should give better chain and sprocket life, though I'm not really having problems with chain or sprocket life as is. And since I already have a 17T sprocket with plenty of service life left, plus spare 17T sprocket, it doesn't make much sense to switch to 40/19.
Tested replacing shifter cables, but not housing, using shifter cables Thorn recommended. This was for practice only, since cables supposedly only need replacement every 20,000 km. Lots of dust inside cable box. Tightening headless screws on cable pulley mangles cable ends, after which they won't fit into tiny holes on cable pulley, so make sure everything is setup correctly before tightening. It would also be wise to superglue ends of cables immediately after cutting, to prevent fraying. I managed to bungle things first time, by forgetting to install cable adjusters before tightening headless screws. Since I had extra cables on hand, I simply cut replacements.
Small parts that can be lost while replacing shifter cables: cable stoppers, ferrules, cable box torx screws, headless screws for cable pulley. Dave Whittle had mentioned the headless cable pulley grub screws as being very small, so I ordered those to add to repair kit. Now that I've gone through this cable replacement procedure, I think I know how to avoid losing these screws. However, since I have them and they weigh next to nothing, I wrapped them in clear tape and threw into repair kit.
I also pre-cut spare cables for repair kit. [Update Oct 2015: Spare shifter cables in repair kit frayed over course of ththree years since I cut them, so I removed them from the repair kit. If shifter cables break in field, then use single-speed to get to nearest town, then order uncut cables and cable cutter. To avoid breakage in field, replace cables every 20000 km.]
Performed another oil change.
Issue with abrasion on inside of chainstays (discussed above and with photo to illustrate problem), seems to have gone away. Touch-up paint that I applied to these abraded areas is still mostly intact, with a few scratches on this paint. Abrasion was probably due to mud clinging to outsides of tires, since that initial long tour was in the spring, and there was some snow and mud at times during that tour. By contrast, tours since have been in dry weather. Scratches on the touch-up paint might be due to occasional pebbles getting stuck to outsides of tires during dry weather tours. I'm not too concerned about this abrasion.
Checked spoke tensions with my Park TM-1 Spoke Tension Meter: range 117 Kg to 167 Kg. Both wheels continue to be true and I did not tighten any spokes.
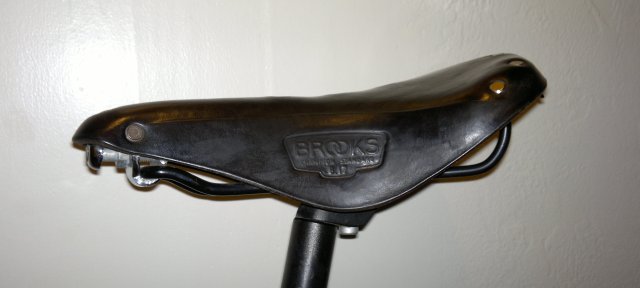
Above is a photo of Brooks saddle after 5000 miles and about 625 hours in the saddle (at 8 miles/hour). Note slight depression in front of rear flange, caused by left sitbone. There is no collapse of saddle into hammock or banana shape, like in some photos of well-worn Brooks saddles.
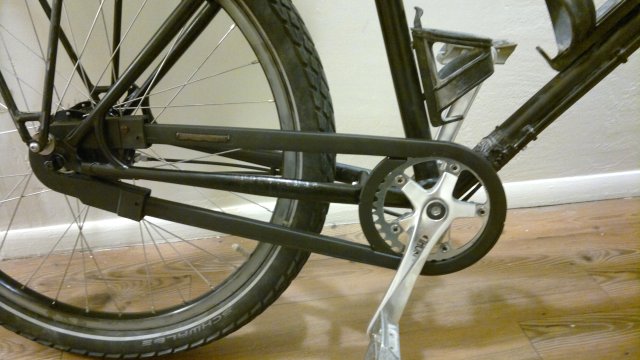
Despite misgivings discussed above, I decided to try Hebie chainglider for Rohloff hubs since I dirtied my boots and probably my pants too several times due to leaning against middle of chain while stopped. Actual weight of Hebie 38T chainglider is 250g. Chainglider is intended for 38T chainrings, but according to comments on Thorn forums, it should also support 36T. Though in fact, it doesn't fit that well, as shown below. Plenty of clearance at rear sprocket, so whatever problem was there originally has been fixed and there is now no danger of abrading the Rohloff hub shell.
[In Oct 2015, I noticed abrasion to Rohloff hub shell, exactly like what people said could be caused by Hebie chainglider. This was two years after I removed chainglider, so either I didn't notice damage when I removed chainglider (maybe because shell was covered by dust), or else something else caused this abrasion, though I can't imagine what.]
Thorn recommends Surly stainless steel chainring for use with Hebie chainglider. Since Thorn doesn't sell 36T Surly chainring, I ordered from JensonUSA. Weight of 110mm x 36T Surly chainring is 90g, versus 120g for Thorn 110mm x 42T aluminum chainring I had on previously. Weight savings is partly due to smaller diameter and partly because steel chainring is half width of aluminum ring.
Thorn aluminum chainring gives chain line of 55mm when placed on outer position of the crank. Compare with Rohloff's recommendation of 54mm chain line and difference is within my error of measurement. Whereas Surly steel chainring gives chain line of about 52mm. So I added 1.2mm chainring spacers to bring chainline closer to the Rohloff recommendation. See here. 2mm spacers would probably be better, but I ordered incorrectly and 1.2mm seem adequate.
Tightening chainring bolts runs risk of stripping nut slots if using screwdriver to hold nut. I ordered Park CNW-2 chainring nut wrench, so as to be able to do job properly in the future. I also added spare chainring bolt/nut/spacer to my repair kit, just in case one gets loose on the road (single chainring bolts).
Comments after 5th tour (odometer 7271 miles, 11706 km)
Jul 2013 - Sep 2013, 80 day, 1929 mile (3104 km) tour of Lassen National Forest, described in detail here.
Hebie chainglider failed to protect chain from dust, started to add drag as it became clogged with dust itself, and finally chainring began catching on chainglider plastic, bending it out of shape and causing rattling noise, which was annoying plus it might mask sounds of other bicycle components failing. So I threw chainglider into trash. This happened after exactly 3 weeks and 642 miles of riding on rugged dirt roads. Part of problem is surely due to using 36T chainring in chainglider designed for 38T chainrings. However, even with proper chainring, I doubt this chainglider would hold up under rugged and dusty conditions I encounter.
Thorn chainguard is alternative for protection from getting pants dirty. However, now that I've gotten my chain cleaning routine down pat, chain is never really that dirty anymore, and thus getting pants dirty is no longer major concern, so I've decided not to get chainguard at this point. (My pants are black, so I was only ever concerned about major amounts of grease, not trivial spots.)
Difficulty turning eccentric to get new chain to fit, whereas it was easy to turn previously. Removed it and found some of that Lassen dust inside. Cleaned and greased shell before replacing.
After about six weeks, I noticed leg muscles were becoming unbalanced because I was only pedaling and never pushing. So I made a point from then on of pushing 2 miles (about 35 minutes) per day. During desert tours, there will probably always be sandy stretches where pushing is required, so I won't have to deliberately force myself to push on those tours.
I had no flats and didn't notice many goathead thorns during this tour, perhaps because I'm getting pretty good at recognizing goathead thorn areas and avoiding them. I'm going to experiment with tire liners on next trip instead of putting sealant in tubes, though I'll carry sealant in repair kit. There was still some liquid sealant in tubes after tour. I've considered going tubeless, but that seems like big hassle, though maybe not. I've never tried tubeless. Updated my page on this issue (see here).
Before performing post-tour oil change, I first drained existing oil, but very little came out. Evidently, oil had mostly leaked out during tour because of how I lay bicycle on right side at night. I don't think this is problem. I cleaned around sprocket about halfway through tour, and then it got oily again soon thereafter, so evidently there was still free oil in hub at that point. Which means at most hub was empty of oil for half tour. But Rohloff says it is possible to run hub for 5000km with no free oil, just whatever oil clings to gears. So I'm probably okay.
One of cable ties holding bicycle computer cable in place broke. Replaced with spare from my repair kit.
Saddle continues to look as in photo above. I applied another light layer of Brooks proofhide to maintain water-repellancy.
Rear rack is being abraded away by bouncing of panniers. Some people install tape to stop this abrasion. I tried that but tape only lasted a few days. Heavier tape might work, though I can foresee some possible downsides (need to replace tape periodically, thus one more maintenance chore, tape accumulates dirt, tape makes it more difficult to install and remove panniers, tape might trap moisture underneath causing worse corrosion). Racks should last at least 7 years at current rate of abrasion (and assuming about 150 days and 500 hours of touring per year). Cost of new rack is $200, including shipping and assuming bad exchange rate. Divided by 7 that's $30/year, which is small. Front racks show no abrasion, because I'm using home-made fabric panniers there. [Update: CycloCamping.com is selling something called "Tubus Anti-Scratch Protection Foil Set", which is specifically designed to protect powder-coating on steel racks from pannier hook abrasion. Lizardskins.com sells various Bike Protection products which could probably be used to protect racks from abrasion. I haven't tried any of these products myself.]
Checked spoke tensions with my Park TM-1 Spoke Tension Meter. All tensions at least 117 Kg. Both wheels continue to be true and I did not tighten any spokes. No evidence of rim wear and brake pads showing minimal wear.
Reinforcements and other design changes I made to various home-made bicycles items seemed to have fixed problems I was having initially. Some stitching coming undone on front panniers, which I resewed at motel. I'm getting close to having my bicycle touring system at same level of perfection as hiking system.
Some discussion on Thorn forums (see here) about rusting handlebar, stem, chainring and crank bolts, and about replacing all these bolts with stainless steel versions. I'm not sure if my bolts are regular or stainless steel. According to Dave Whittle of Thorn, as of 2014 Thorn has replaced crank and chainring bolts with stainless steel versions, but will not be replacing handlebar and stem bolts due to liability concerns. Stainless steel has lower tensile strength than ordinary steel, and handlebar/stem manufacturers refuse to warranty use with stainless steel. However, users can replace these bolts on their own, if they are willing to take risk. Probably not an issue for me, given how I tour in mostly dry areas.
Comments after 6th tour (odometer 9367 miles, 15072 km)
Oct 2013 - Jan 2014, 83 day, 2069 mile (3329 km) tour of Mojave desert area, described in detail here.
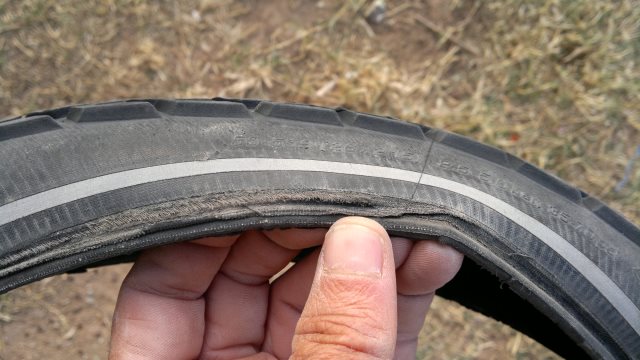
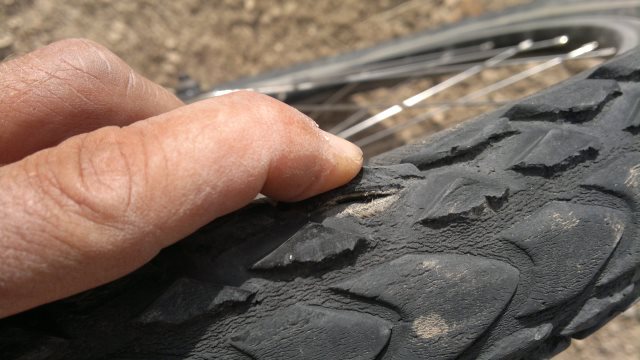
Both Schwalbe Marathon Mondial 55-559 tires failed on this tour, as shown below. First failure was due to bead separation on rear tire after about 8611 miles usage (13855 km). Second failure was due to tear in rubber on front tire after about 8687 miles usage (13977 km). I had previously swapped tires to even out wear, so neither was exclusively rear or front. Bead separation failure manifested as thumping and wobbling sensation with each revolution of rear wheel. At first, I thought this might be bearing failures in Rohloff hub. But then when I turned bicycle upside down and spun rear wheel to investigate, it was obvious it was just tire problem. (What a relief that was!) I replaced tire immediately with spare in repair kit (Schwalbe Marathon Extreme 50-559), then placed order for new tires when I got to town, and also picked up cheap temporary spare at Kmart. Front tire failed before replacements arrived, but I didn't have much confidence in Kmart tire and so decided to put tire boot in front tire and continue running with that for another few days. However, Park-brand tire boots in my repair kit had somehow gotten lost, so I just reinforced with duct tape instead. It may not be obvious from photo, but kelvar fabric is still intact under torn rubber and remained intact until new tires arrived. I'm not sure if my lack of confidence in Kmart tire was justified. Maybe I'm just being snob because Kmart tire only cost $17 and Schwalbe Mondial costs $80. In any case, front tire held on for another 4 days and 100 miles of touring until new tires arrived (via UPS from cyclocamping.com, shipped to motel with whom I had made arrangements).
I've read of people getting 25000 km from Schwalbe XR's, which is what Mondial replaces, but I'm not dissatisfied with 14000 km. At least 20% of my riding is on extremely rugged hardpack, with sharp rocks that tear into rubber and with tires pulled from side-to-side during descents, which stresses bead area. I suspect those people getting 25000 km are mostly running on paved roads. Given that my average speed is under 8 mph (13 km/hour), due to being mostly on dirt roads, I'm probably getting more usage in terms of hours than people running on mostly paved roads, even if I get less usage in terms of distance. I'll probably not push tires to failure in the future, especially not on Nevada backcountry tours, since those are where I am furthest from civilization.
Tire liners I experimented with didn't work well (failed to protect from goatheads, caused flats by slicing into inner tube), as discussed on flat prevention page. I threw tire liners away after 1200 miles and went back to previous system of Stans sealant in inner tubes.
Handlebar bag needs to be redesigned to avoid abrasion that is occurring with current design. New design requires dual 105mm x 0° accessory bars rather than just one, so ordered new bar from SJSCycles. Even with two accessory bars, still much less weight than Ortlieb handlebar bag, and also roomier and more convenient for my purposes.
Reinforcement patches on front panniers doing their job, but need replacing. Saddle bag needs new straps and also spare set of straps. Rack bag also needs spare set of straps. Nothing wrong with straps and reinforcement patches wearing out, since this is easy maintenance issue and I am saving huge amounts of weight on tour by using my own rather than commercial gear.
Two problems with Ortlieb panniers. First, nylon carrying handle broke, but this is easy field repair. Second, one of side-release buckles partially broke. I was able to limp along with partially broken buckle until I got home, then replaced it using sewing machine. Full discussion and photos here. I continue to be very happy with these panniers. Over 300 days of touring on rugged ground (causing panniers to bounce a lot) and still going strong, other than problems just noted.
Damaged brake pads on front brake due to trying to jam wheel back in after repairing flat. I forgot that tire needs to be deflated to fit between brake arms. Stupid of me. Luckily, I had spare brake pads in repair kit. These are Swissstop blue pads, because of CSS coating on my rims. These pads are only sold by a few distributors, mostly in Europe. Ordered another set as part of order with SJSCycles, to replace one used from repair kit.
Met another dirt road bicycle tourist for first time (blog is wanderingbybicycle). He was riding Surly Troll frame with Rohloff hub, Marathon Mondial tires, Brooks saddle, just like me, but using disk brakes. Said his frame swayed into S-shape when heavily loaded, yet I doubt his maximum load is anywhere near my 45 Kg. I've sometimes wondered if Nomad might be overbuilt (I'm not enough of bicycle expert to know for sure), but comment like that makes me appreciate its stiffness. My Nomad laughs at mere 45 Kg load plus 80 Kg for rider. As noted above, my initial order included disk brake option for Rohloff hub, so I can later change to rear disk brakes, but I see no reason to change at this point, since rim brakes are working fine. "If it ain't broke, don't fix it." Of course, I tour in mostly dry conditions.
Speaking of brakes, Thorn has updated Nomad brochure to indicate that CSS rims can become polished with use, leading to poor braking performance when wet, and so using CSS on both wheels is not advisable. They advise non-CSS rim on front and CSS on rear. This is probably not an issue for me, since I avoid riding in wet conditions and also avoid riding very fast. I'd rather have longer-lasting rims than great braking performance. My brakes continue to work fine when I merely run wheels through puddles, since brakes soon dry out rims.
Checked spoke tensions with my Park TM-1 Spoke Tension Meter: range 117 Kg to 167 Kg. Both wheels continue to be true and I did not tighten any spokes.
Performed another oil change. Procedure is very easy now that I've done it five times. My average interval is thus 3000km vs the 5000km Rohloff recommends. Since I'm reusing oil change kit (syringe, two bottles) and getting oil from liter bottles I ordered from SJSCycles, cost per oil change is very low. Waste oil goes in an empty yogurt container to carry to dumpster.
At end of the tour, chain measured over 1% stretch. At start of the tour, chain wore down quickly and made horrible grinding noises as it settled in to match worn sprocket. Grinding never entirely disappeared due to mismatch between sprocket and chainring, which is worn only slightly. Decided to reverse sprocket and install new chain. Grinding of new chain was horrible initially, so maybe there is wear on both sides of sprocket. My notes don't indicate, but I may have reversed sprocket previously. Plan is to just leave whole drivetrain alone for several years until everything needs to be replaced.
In July 2014, Thorn sent email alert that one owner had experienced failure of flat-track handlebars, possibly due to corrosion from perspiration seeping down gap between Rohloff shifter and Ergon grips. (I thought aluminum was immune to corrosion other than under exceptional conditions?) I removed shifter and grips to inspect handlebar, but saw no signs of corrosion or other damage, other than small scratch (probably caused by piece of dirt caught inside grip, which scratched paint when I rotated grips to get them positioned just right). TBC To be continued...
Comments after 7th tour (odometer 11793 miles, 18795 km)
Jul 2014 - Oct 2014, 71 day, 2008 mile (3231 km) tour of Northeast California (Lassen and Modoc National Forests) and Northwest Nevada, described in detail here.
Installed new tubes and sealant prior to trip, as precautionary measure. Old tubes were still in fine condition.
Small dent in top tube, as shown below. Has no impact on performance. Unlikely to be manufacturing problem. I see this dent as confirming that Thorn made right decision in going with thick-walled and thus heavy tubing, since whatever caused this dent would have ruined frame with thin-walled tubing. Bicycle used for adventure touring is going to suffer abuse. Extra pound of weight to move around is less of problem than frame damaged beyond repair.
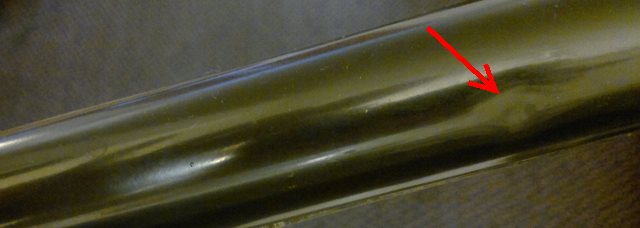
Sigma BC509 wired bicycle computer stopped recording several times for short periods (maybe 15 miles total during entire tour). Once while riding in rain, presumably due to water getting between computer itself and wire contacts, and other times while dry. After jiggling wire, computer resumed recording. I'm probably going to replace computer with wireless computer at some point.
Another side-release broke on Ortlieb panniers, as described here, except on other pannier. As before, side-release only broke partially and I was still able to close panniers. Replaced when I got back home. Maybe these Ortlieb side-releases are flimsy or maybe breakage is to be expected at some point. 3/4" side-release on my backpack once break and I've seen other people with broken 1.5" and 2" hip-strap side-releases, so side-releases are known to be common point of failure. I'll probably add something to repair kit to enable closing panniers in case side-release every breaks completely. All things considered, I continue to be happy with these Ortlieb panniers.
Ran out of White Lightening Epic Ride lubricant and so picked up some PTFE-based Triflow in two forms: (a) bottle specifically designed for bicycle chains at bicycle store; (b) aerosol spray can at a hardware store. Triflow spray can is bulky to carry in saddlebag and makes mess during application, but otherwise works same as bottle form. This is good to know, since Triflow in spray cans is commonly available at hardware stores in United States. Triflow bottle has secure lid and can be applied to chain as easily as Epic Ride. Both versions of Triflow appear to last significantly longer than Epic Ride and don't pick up any more dirt than Epic Ride. However, Triflow stinks horribly, much worse than Epic Ride. If I spill even a single drop on one of my fingers, I have to be careful to wash with chain cleaner and soap, or I'll become nauseous when I bring that finger near my nose later while eating. I'd hate to think what would happen if Triflow bottle leaked somehow in saddlebag. So I'll be returning to Epic Ride as standard lube, but will be more careful to make sure I start tours with full bottle, since Epic Ride is only available at bicycle stores (and sometimes bicycle section of Walmart).
After trip, performed another oil change.
After trip, installed Thorn chainguard, which required replacing bottom bracket. (I used tools at Reno Bike Project workshop for this.) Then I removed chainguard day after installing it, because it seemed useless and perhaps future source of problems. Full discussion above, in section on obsolete ordering options, where there is also photo of installed chainguard. Not sorry about this experience for two reasons: (a) I needed practice replacing bottom bracket; (b) I can finally forget about this chainguard, which has distracted me for years with question of whether it is worthwhile or not.
After trip, replaced Brooks saddle with Selle SMP TRK Men's saddle, black color. Brooks was never uncomfortable, but I became concerned that long-term use might cause injury to soft tissues of pelvis. Selle SMP TRK also less weight than Brooks, doesn't require protection from rain, won't collapse into hammock shape if ridden when wet, doesn't require periodic proofhide application. In looking back, now that I've seen the light, I think there's a cult effect associated with Brooks saddles. Maybe they are better than cheap saddles, but they are definitely not better than hi-tech saddles like Selle SMP models.
Comments after 8th tour (odometer 12603 miles, 20278 km)
Dec 2014 - Jan 2015, 23 day, 754 mile (1213 km) tour of Mojave Desert, described in detail here.
Selle SMP TRK saddle significantly less comfortable than Brooks B17, however I plan to continue with Selle SMP saddle for health reasons.
Needed to replace rear Swiss Blue brake pads after returning to Reno. These were the original pads, so they lasted about 12700 miles (20434 km). They would have lasted longer with with less toe-in. I had forgotten how to put washers together for shoe holders, so job took about two hours and also got my arms dirty with chain grease from flipping bicycle over several times. Once again, I noticed how easily small parts of brake shoe holders can be lost, so I decided to add replacement set of shoe holders to repair kit (40g).
Though I'm fully satisfied with Nomad for my purposes, I think Thorn should add support for rear cable disk brakes with rear racks. Nomad currently supports only hydraulic disk brakes when using rear rack, due to clearance issues with cable disk brakes. However, hydraulic disk brakes are bad idea for touring due to difficulty of field maintenance. Mercury design allows cable disk brakes with rear racks by moving disk brake mount backwards of rear hub. Assuming positive field experience with Mercury design, same design should be added to Nomad.
Mercury also has option for heavy-duty rigid fork, to allow mounting front disk brake without going to suspension fork. Again, assuming field experience is positive, similar option should be added to Nomad.
I have no intention of switching to disk brakes myself, for several reasons: I prefer simplicity and ease of maintenance of rim brakes; as noted, mud is not major problem for me; wear from rim brakes is also not major problem for me, since my rim sidewalls are CSS coated; rigid fork stiff enough to support disk brakes would give harsher ride than my current fork (there is also possibility of suspension fork, but that adds considerable weight and maintenance hassles).
Comments after 9th tour (odometer 14489 miles, 23313 km)
Aug 2015 - Oct 2015, 64 day, 1732 mile (2787 km) tour of Lassen and Modoc forests and northwest Nevada desert, described in detail here.
Selle SMP TRK saddle is very comfortable for 2 hours, okay between 2 and 4 hours, painful after 4 hours of riding per day. I average about 3 hours/day of riding and seldom go beyond 5 hours, so this is not a major problem for me. I'm thinking of replacing with leather coated PRO model (TRK model is vinyl coated), which might be slightly more comfortable.
No flat tires or other breakdowns.
For city use only, added Cateye Volt100 front light (150 lumens, micro USB chargeable lithium-ion battery, 2 hours usage on high, 6 hours low, 30 hours blinking), NiteRider 5.0 SL tail light (2 AAA batteries). I already have a Planet Bike tail light (2 AAA batteries) which I carry while touring (though I almost never use it) and also use in the city. However, the tail light could fail on me while riding, without my noticing it until I get to my destination, so I wanted two tail lights for city use. Failure of front light would be obvious and also that light is less important from safety point of view.
Checked spoke tensions with Park TM-1 Spoke tension meter: range 105 Kg to 167 Kg. Tightened two spokes on front wheel that were under 105 Kg tension.
Cleaned and greased EX-box. Long time since I did this, though Rohloff recommends every 500 km, plus box had come unscrewed during tour and gotten filled with grass crud.
Oil change.
I noticed abrasion to Rohloff hub shell, exactly like what people said could be caused by the Hebie chainglider. This was two years after I removed chainglider, so either I didn't notice damage when I removed chainglider (maybe because shell was covered by dust), or else something else caused abrasion. Photo here.
Issues with lube bottle caps leaking, breaking or jamming. Final conclusion is there is nothing wrong with lube bottle design, but I do need to ensure cap is tight and not defective when removing from factory packaging. Because lube bottles can break, bring multiple small bottles rather than one large bottle. Same thing for chain cleaner and other liquids: multiple small bottles better than one big bottle.
Tightened chain by one notch of eccentric bottom bracket during tour. Experienced constant difficulties during tour with chain making noises unless I kept it heavily lubed. Upon returning home, replaced current 17T sprocket with spare 17T sprocket I had in storage and also fitted new chain. Unable to loosen sprocket at home, so used bench vise and shop size chain whip at Reno Bike Project. See photo below comparing old and new sprockets. Current sprocket was not heavily worn, but it was worn enough to get out of sync with chainring, and that was likely cause of grinding noises. Next time sprocket is worn, switch to a Thorn 40T aluminum chainring with 19T sprocket, versus current 36/17 gearing. My thinking is that alumimum chainring will wear faster than current Surly stainless chainring, even though slightly larger diameter, while 19T sprocket should wear slower than 17T sprocket, due to larger diameter, so longer for chainring and sprocket to get out of sync, like maybe 50,000+ km. Even 23000 km I got out of this sprocket is not bad, however.
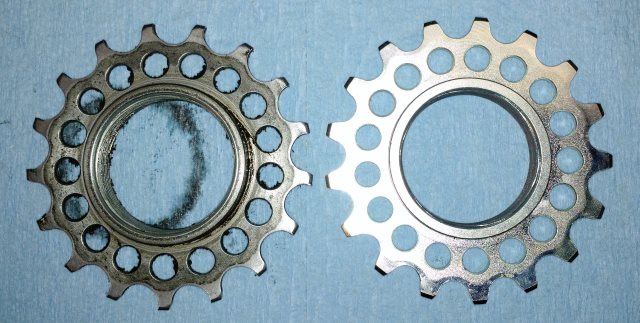
After tour, replaced YWS Ring Lock, from Velo Orange (390g), with TiGr Mini Lock (490g). I had some concerns about YWS Ring lock jamming somehow, leaving me unable to unlock it, whereas this seems less likely with TiGr Mini due to higher quality construction. Other advantages of TiGr Mini: (a) stored on underside of down tube, using water bottle mount, rather then taking up space in saddlebag; (b) more conspicuous, so less likely that opportunistic thief will not notice bicycle is locked, then break spokes when he tries riding off with it; (c) large enough to lock frame to bicycle rack or other pole. Shouldn't ever need lubrication, but only use graphite lubes if lubrication is eventually required.
After tour, added side screws to pedals. I left these off when I initially installed pedals, due to concerns about them tearing backs of my pants or legs when pedals rotated while pushing bicycle. I have since gotten into habit of keeping my legs away from pedals when walking, so they no longer hit me, so no longer reason not to have side screws. Pedals don't slip much, but little extra traction wouldn't hurt, which is reason to add them.
After tour, added spare 6 liter Dromedary bladder to repair kit. Cost in terms of weight and space is small versus convenience of having spare on hand in case of leak that can't be field repaired.
Front pannier attachment strap was tearing, so replaced it when I got home. Panniers have been used since July 2014 and are starting to show other wear. So probably should plan on replacing straps every 9000 km or thereabouts (typically 3 tours, 1.5 years) and entire pannier every 18000 km (typically 6 tours, 3 years). I continue to think these home-made front panniers are better design for my purposes than Ortlieb front panniers.
3 breakages of Ortlieb straps during tour, all quickly repaired in field thanks to good pannier design. They lose about a centimeter of length with each repair, so replaced straps when I got home.
Examined spare brake and shifter cables in repair kit upon returning home. Ends of both spare shifter cables were fraying, despite having applied superglue when they were cut. This will make it impossible for them to fit through cable guides in Rohloff EX-box, hence they are useless as spares. Removed them from repair kit and will henceforth be careful about replacing shifter cables every 20000 km, as Rohloff and Thorn recommend, so as to avoid field replacement. Last replacement was at 8500 km, so I'm still okay for another few tours. No fraying of spare brake cables, so those remain in repair kit (stored in home-made cable holder).
Washed collapsible hiking staff (stored against front fork and used for defense against dogs and for supporting front of tarp) upon returning home, as staff had gotten dirty from grit and was jamming.
Comments after 10th tour (odometer 15623 miles, 25143 km)
Dec 2015 - Jan 2016, 43 day, 1063 mile (1710 km) tour of Mojave desert, described in detail here.
Never noticed discomfort from Selle SMP TRK saddle, so evidently my body is adjusting to it. This is plastic saddle, with foam padding, and so never "breaks in" and conforms to body like leather Brooks saddle. Rather, body must conform to saddle.
Grit got into TiGr Mini lock cylinder and jammed it somewhat. I managed to clear grit out, and thereafter stored lock cylinder in saddle bag, with only bow stored on underside of down tube. Otherwise, I'm very happy with this lock.
Mirror somehow cracked, maybe hairline crack long ago from dropping bicycle at some point, that later propagated due to vibrations and thermal expansion when outer part of frozen mirror warms up rapidly as sun comes up. Replaced upon returning home.
One flat tire, due to large thorn (not a goathead) that got stuck on inside of rear tire and kept ripping tube open so that sealant wouldn't work. Dismounted, applied patch, installed new sealant, no further problems. Noticed nylon rim strip had shifted and crinkled, and seemed stiff as well, as from age. Replaced with spare rim strip from repair kit. Stiffness suggests these rim strips should be replaced periodically. Perhaps replace every 8000 miles (13000 km), same as tires and tubes. Upon returning home, replaced following items in repair kit: (a) spare rim strip (but need to order more of these, since local stores only have Velox and rubber rim strips, rather than quality nylon); (b) tube of patch cement (since it will dry out now that it has been opened); (c) bottle of sealant.
Bent stainless steel Surly chainring when bicycle bounced to side during rugged descent and chainring hit big rock. Managed to bang it back into shape in the field using side of adjustable wrench. Based on this experience, I might stick with steel chainring, rather than switching to aluminum as I discussed above in report of my previous tour. Aluminum might have fractured, whereas steel tends to bend and then can be bent back into shape. Need to think about this some more. TBC To be continued...
Tightened eccentric bottom bracket once. Chain was getting loose again towards end of tour. Replaced chain upon returning home, per new plan to replace chains frequently and thus reduce wear on chainring and sprocket.
Used less than one 2oz bottle of chain lube, and also still had some chain cleaner left over from what I started with, so what I'm carrying is overkill. Nevertheless, I will continue to start tours with three 2oz bottles of lube (one of which might be only partly full) and two full 4oz bottles of cleaner fluid, given that bottles can break and extra cleaner fluid is useful for cleaning hands as well as chain.
For 2016, Rohloff has announced new sprocket design, which eliminates difficulty replacing sprocket. See here.
Comments after 11th tour (odometer 17250 miles, 27755 km)
Aug 2016 - Oct 2016, 64 day, 1578 mile (2539 km) tour of Lassen and Mojave national forests and northwest Nevada backcountry, described in detail here.
Before tour, replaced tires installed at 8902 miles (14323 km), so that makes 6721 miles (10814 km) of usage, without rotation. Tires showed signs of wear, especially rear tire, and I want to stay on safe side, since I really don't want another experience of tire failure during tour. Replaced inner tubes at same time, also to be on safe side, and filled new tubes with sealant.
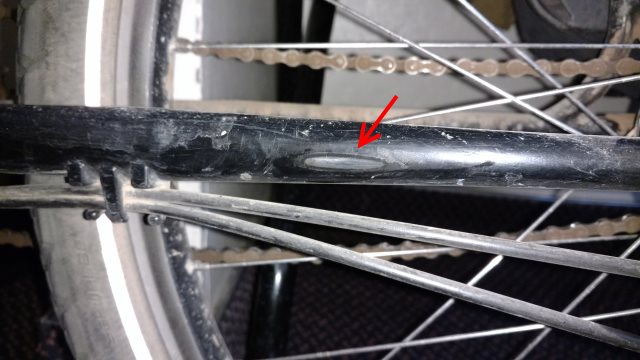
During tour, noticed paint had been abraded down to bare metal on outside of left chain stay, as shown above, due to occasional contact with hiking boots while pedaling. I don't plan to touch up area, since bicycle stays dry most of the time, and rust is thus only very superficial.
Used less than one 2oz bottle of chain lube during tour, and also still had some chain cleaner left over at end of tour from what I started with.
After tour, replaced chain and performed oil change (last oil change at 23313km, so almost at recommended service interval of 5000km).
After tour, checked spoke tensions with Park TM-1 Spoke tension meter: range 85 Kg to 148 Kg. Not sure why tensions are lower than previous readings. Maybe I'm measuring differently. Wheels continue to be true and I did not tighten any spokes.
After tour, replaced shifter cables (last replaced at 8492 km, so almost at recommended service interval of 20000km) and lubed external shifter box. Had some problems installing new cables initially, so dismanteled twist shifter to see what was wrong. Cable pulley inside twist shifter is made of plastic, which seems weak point. Compare with aluminum cable pulley in external shifter box at hub. Might want to order spare plastic cable pulley for storage locker.
Vinyl covering of Selle SMP TRK saddle starting to crack, though should last another tour. Saddle was installed at 11793 miles (18795 km) and so has lasted 5457 miles (8780 km) thus far. Ordered replacement but won't install until current saddle falls apart completely. Bicycle that looks like junk, which is how Nomad looks with that cracked saddle and dirt covering everything, is less tempting to thieves.
Comments after 12th tour (odometer 18538 miles / 29828 km)
Nov 2016 - Jan 2017, 43 day, 1207 mile / 1942 km tour of Nevada backcountry and Mojave desert of southern California, described in detail here.
Nomad frame broke with about 18250 miles / 29364 km on the odometer, weld between top and seat tubes. I was able to continue riding back to nearest town, where I checked into motel and contacted Thorn for advice on temporary fix to allow me to continue riding. Best suggestion was compression strap from auto parts store to hold top tube in place. Since edges of broken weld still mate perfectly, and since top tube is normally under compression while riding, all that is needed is something to keep weld together when hitting bumps, and compression strap does just that. See photos below. This allowed me to continue riding another 288 miles / 463 km, much of which was over rugged dirt roads, to where I could catch bus to my hometown of Reno, where I will have access to workshop. Frame will be replaced under Thorn's lifetime warranty. According to Robin Thorn, this is first failure ever of any Thorn frame at top to seat tube weld. I am not a very heavy rider (175 pounds / 80 kg) and my loads are well within Nomad specs. Reason I'm first user to break frame at this weld is probably either manufacturing defect or because I have been doing a lot more pushing than normal. Pushing, or rather wrestling, loaded bicycle forwards using handlebars, in order to get through deep sand and over rocks and ruts in washed out roads, puts unusual stress on top to seat tube weld. Pushing is very unpleasant way to travel, but was necessary as part of my exploration of backcountry dirt road network. At this point, I am finished exploring and plan on repeating same routes over and over, doing my best to avoid those roads that require excessive pushing, so there shouldn't be problems with frame breakage in the future.
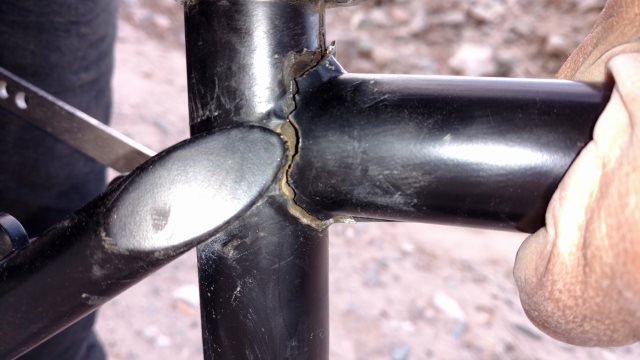
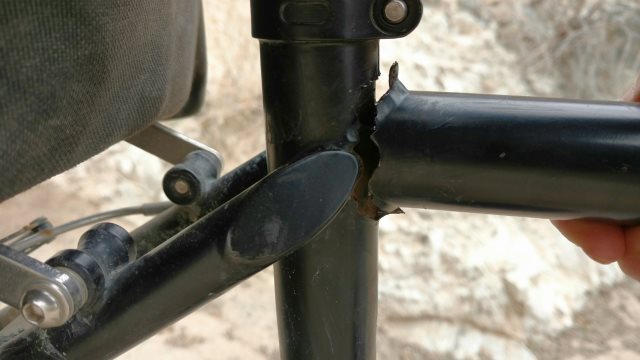

Once I got back to Reno, I arranged with Thorn to send replacement frame. Shipping was by air freight, with delivery exactly 7 days after finalizing warranty replacement order. There was no charge for either replacement frame or shipping. Replacement frame included installed headset, eccentric bottom bracket holder, seatpost, seat tube shim. As with original bicycle, there was also vial of black touch-up paint included, which I immediately put to use covering up more obnoxious logos on new frame, leaving only the small logo at bottom of the seat tube and logos on chain stays.
Seatpost included with frame was pleasant surprise, since I had ordered another seatpost to be sent in same box as frame, along with new handlebar. So now I have seatpost in storage, which is actually good since I really need to periodically replace seatpost. Both seatpost and handlebar are aluminum and thus have limited lifespan under heavy use, whereas steel can last forever in absence of rust. According to Dave Whittle, I am well overdue for seatpost replacement. Stress is particularly high on seatpost, since it flexes every turn of pedals, as my body weight shifts from side to side. Because I sit fairly upright, stress on handlebar while riding is low, however there's significant stress during pushing. Also, handlebar is thinner and longer than seatpost. Also, failure of seatpost would not be a disaster, since I could still ride standing up or else push, whereas failure of handlebar would make riding impossible and pushing difficult (hiking stick could be used as an improvised handlebar for pushing, if necessary). Which is why I am replacing both of these items.
Stem is also aluminum, but I use short 75mm stem, ride fairly upright and so don't push down much on stem, and stems are massive compared to handlebars and seatpost, so failure is unlikely. If stem failure did occur in backcountry, I would probably just hike out to town, order replacement, then get ride back to wherever I left bicycle and perform field replacement. Cranks are also aluminum, but massive and hence unlikely to fail, plus I could still push after crank failure. Finally, there is Rohloff shell. As discussed here, Hebie chainglider apparently etched line in shell during short time I used that contraption, and it is conceivable that line could propagate and eventually cause shell to crack open, which would be real disaster. I'm thinking of having shell replaced when I eventually need to replace rim on the rear wheel, though of course this will be very expensive. TBC To be continued...
I used Reno Bike Project workshop, just down street from motel I currently call home, to transition to new frame. Despite having performed shifter cable replacement just three months ago, and so having recent experience at this task, I managed to bungle things twice. Luckily, I had ordered two sets of new cables and also brought with me two additional sets from storage, just to be on safe side. First bungle occurred when I cut cable 200mm from stops without pulling tightly, so that cables were too long. After seeing my error, I cut again, but by now cables had been handled too much and were starting to fray, so ends wouldn't fit in tiny cable pulley holes. Second bungle occurred when I failed to put cables through cable adjusters before inserting ends in cable pulley holes. I noticed this error before tightening headless screws, and so was able to pull cables out, install cable adjusters and try again to insert into cable pulley holes. However, as with first bungle, cables had been handled too much by this time and were starting to fray, and so would no longer fit properly into cable pulley holes. Two of my fingers were bleeding at this point from punctures from strands of shifter cable wire. I finally managed to get everything put together on third attempt. Lesson relearned: have lots of spare Rohloff shifter cables on hand when doing one of these cable installs/replacements. It would also probably be a good idea to perform shifter cable replacement as first or only maintenance procedure of the day, so that mind isn't tired, and perform it in calm environment (such as back at motel room) versus crowded and noisy public workspace. I should note I also ordered spare plastic Rohloff twist shifter cable pulley (discussed in comment for eleventh trip), just in case I bungled that. That spare now sits in storage.
New handlebar only 580mm, versus 640mm for the old. I liked wider bar, but everything managed to fit on new bar, so I guess it doesn't matter. What I ordered was this. Maybe I ordered wrong item.
Eccentric bottom bracket holder included with frame was another pleasant surprise. I already had one of these in storage as spare, and now I will have two spares. While moving old eccentric to new frame, noticed I'd managed to bungle that part pretty badly over past few years with unevenly placed indents. I've experienced no slippage or other problems, so maybe bungled eccentric isn't a problem.
Replaced rear brake cable.
Removed, regreased and reinstalled Rohloff sprocket.
Replaced chain with another SRAM PC830.
After transitioning to new frame, used hacksaw to cut off broken area of old frame. Photo below. No evidence of rust (reddish color in photo appears to be copper-colored anti-seize and anti-corrosion compound applied during frame manufacture/preparation). Cut pieces sent to Thorn for evaluation. TBC To be continued...
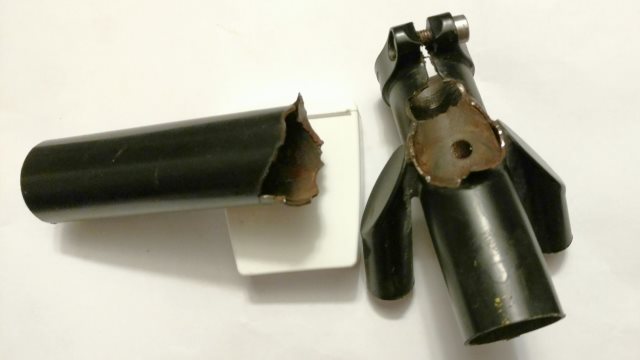
During last week of trip, only time there was heavy rain while camping, I noticed that both Ortlieb panniers now leak. No plans to replace panniers yet however, given how infrequently I encounter rain. Leakage not problem when it does occur, since food in panniers protected by opsaks and electronics by dry sacks.
Replaced reinforcement patches in home-made front panniers. Replaced drawcord in saddlebag.
Changed oil in Rohloff hub and replenished consumables in repair kit, as part of plan to move all bicycle annual maintenance to January.
Comments after 13th tour (odometer 19096 miles / 30725 km)
Sep 2017 - Oct 2017, 22 day, 497 mile / 800 km tour of Lassen National Forest, described in detail here.
Rohloff rubber twist shifter handle disintegrating. Maybe I spilled some sort of solvent on it while replacing frame and didn't clean properly, then solvent gradually dissolved rubber these past 8 months. Fixed problem by wrapping handle with duct tape. Duct tape quickly became dirty and ragged looking. Combined with cracked saddle, dusty frame and homemade panniers, ragged duct tape on shifter helps make bicycle look truly junky, reducing likelihood of theft. Several times people asked if I was looking for day labor jobs, so evidently rider of bicycle also looking pretty junky these days.
Comments after 14th tour (odometer 20453 miles / 32909 km)
Nov 2017 - Jan 2018, 48 day, 1269 mile / 2042 km tour of Nevada backcountry and Mojave Desert of southern California, described in detail here.
Head of 8mm bolt attaching saddle to seatpost sheared off during tour. No spare 8mm bolts in repair kit. Removed saddle and stored in pannier. Lowered seatpost to avoid injury in case I fell back accidentally. Rode standing up to get to town (only an hour away). Only 8mm-1.0 thread x 25mm bolts at auto parts stores had hex heads, rather than allen wrench heads, which made tightening and adjustment difficult, but nevertheless managed to tighten adequately using adjustable wrench. Original seatpost lasted 29828 km, when it was replaced as part of frame replacement, without bolt breakage. Current seatpost, of different design, had bolt break at 32719 km, so less than 3000 km usage. Either defective bolt or bad saddle attachment design. Seatpost whose bolt failed resembles photo below:
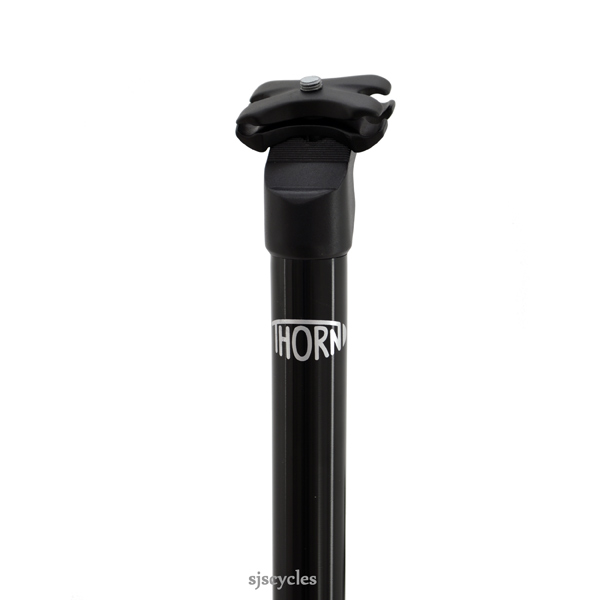
Upon returning to Reno, discarded above seatpost and replaced with seatpost in storage, which resembles photo below:
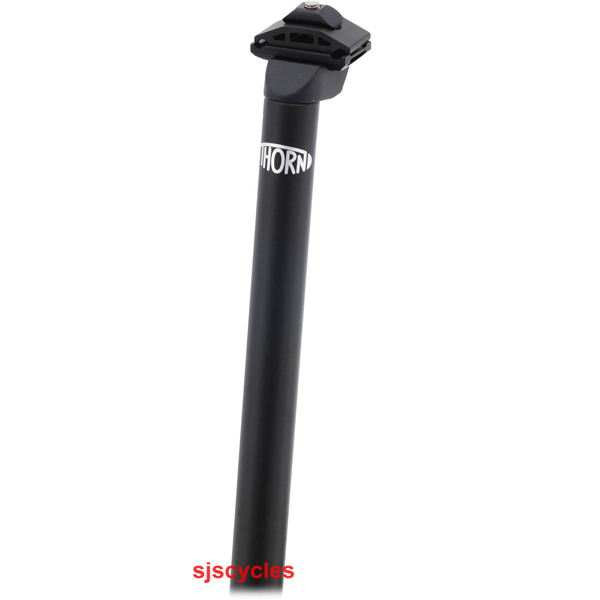
New seatpost configured as follows for max comfort with Selle SMP TRK saddle:

Since trip ended in January, performed annual maintenance: oil change; regrease Rohloff EX box; new SRAM PC830 chain.
Additional maintenance: replace rubber grip of Rohloff shifter, which was disintegrating, with new grip ordered from SJSCycles; resew worn stitching on one homemade front pannier; buy another TiGr lock cylinder to replace lock cylinder lost during tour; tightened front hub; minor truing of front wheel (using tools at Reno Bike Project) to eliminate some rubbing against brake.
Comments after 15th tour (odometer 21579 miles / 34721 km)
Nov 2018 - Jan 2019, 43 day, 1055 mile / 1697 km tour of Mojave Desert of southern California, described in detail here.
At about odometer 20675, right pedal broke free from spindle. Maybe broke some sort of lock ring, due to repeatedly resting heavily loaded bicycle on right side. Still able to pedal, using just spindle, though more difficult than usual, especially going uphill. Proceeded 90 miles to town. Replaced pedal using parts and tools ordered by internet and delivered to local RV park with whom I made arrangements. Broken pedal Shimano PD-MX80, replacement PD-GR500, since PD-MX80 no longer available.
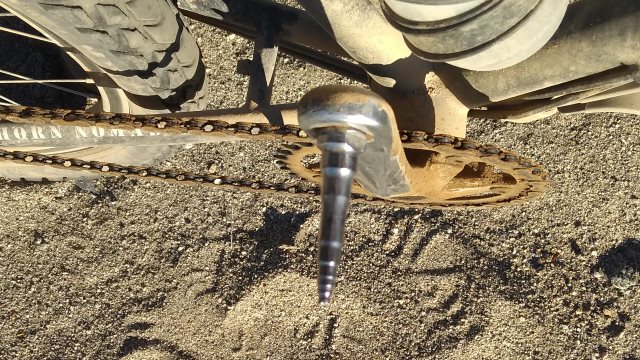
For some reason, I forgot to note in this document when pedals were installed. I believe after tour 7, or at about 18795 km, so failed after about 16000 km. So need to think about replacing pedals every 15000 km, assuming I continue to rest bicycle on side. Alternatives to resting on side are even worse. Kickstand attached to frame invalidates Thorn frame warranty, which suggests such kickstands somehow cause damage to frames, which I definitely don't want. Long ago, I tried using stick to prop bicycle up (and continue to use hiking stick in this way while cleaning/lubing chain, on desert tours where nothing else to lean bicycle against) but configuration not stable in high winds or if ground soft. When heavily loaded bicycle falls over, after being propped up by stick, shock impact damage to handlebars, stem, pedals, crank, bottom bracket and other parts is much, much worse than damage from gently lowering bicycle onto side and then leaving it there.
Plastic bracket, which stores TiGr Mini lock on bottom of down tube, showing some cracks, so ordered and installed replacement. I had previously installed strap, with hook-and-loop closure, to hold lock in bracket in anticipation of bracket tabs cracking, since design appears weak. Also, every so often I accidentally kick lock while lowering bicycle onto side, which tends to stress bracket tabs.
Replaced Selle SMP Trk saddle with identical in storage, because cracked vinyl was irritating skin during recent trip. Original installed about 20300 km and first started cracking about 28150 km, so after about 7850 km. Replaced after about 14400 km. Might try leather covered Selle SMP Pro next time, to avoid problem of cracked vinyl.
Annual maintenance: replaced chain (SRAM PC830).
Comments after 16th tour (odometer 22984 miles / 36981 km)
Nov 2019 - Jan 2020, 53 day, 1304 mile / 2098 km tour of Mojave Desert of southern California, described in detail here.
One flat tire, due to wire (presumably from disintegrated truck radial tire) embedded in tire, so that it kept ripping tube open. Removed tire for inspection, found and removed wire, unable to find slow leak in tube. Remounted tire, refilled tube with sealant, sealant plugged slow leak. Replaced Schrader valve core in one tube, because clogged from sealant.
Noticed flexible rubber tube of Lezyne Pressure Drive pump is tearing. Two such pumps in repair kit but I only use primary. Tube on spare pump in like new condition. Primary pump my only travel pump since 2012, so 8 years and 37000 km usage. Able to buy replacement tube on amazon.com for $13 versus entire pump for $40.
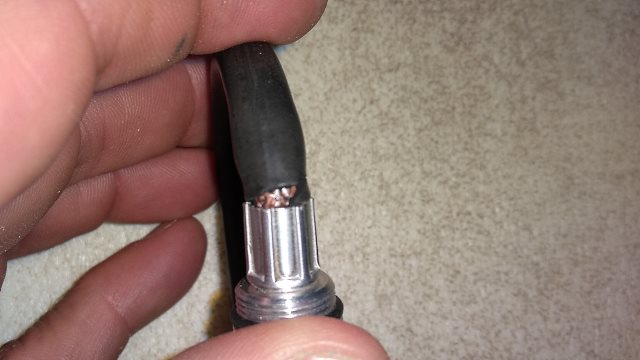
Both front panniers showing wear, so sewed up new pair. Minor updates to design to reflect wear pattern and to accommodate new style of 6L MSR Dromedary bladder, which is slightly larger than old style. Panniers last replaced in Jun 2014 at odometer 9777 miles / 15731 km, so about 21249 km usage.
Replaced both 6L MSR Dromedary bladders that were leaking at end of previous trip. Then another bladder started leaking during trip, but able to repair using SeamGrip upon return to Reno. Can't think of better way to carry huge amounts of water than these Dromedary bladders, so just accept that they will need regular replacement, at rate of maybe one $50 bladder per year.
Annual maintenance: changed oil, regreased Rohloff box, replaced chain with another SRAM PC830.
Replenished consumables: chain lube, chain cleaner, spare schrader valve cores, bottle of sealant in repair kit.
Shifter cables last replaced 29828 km, or 7153 km previously, versus scheduled replacement interval of 20000 km. About 6 years until next replacement.
Tires, tubes, rim strips last replaced 25143 km, or 11838 km previously, versus scheduled replacement interval of 13000 km. Probably could get another year of usage, which would bring odometer to about 14000 km, but safer to replace before next trip. [Later] Because of covid-19 pestilence, I was trapped in Europe for all of 2020 and didn't return to USA until November 2021, at which point I changed tires (Schwalbe Marathon Mondial 55-559), tubes (Schwalbe AV13), rim strips (Thorn reinforced nylon) as planned, using items in storage (stored in plastic bag to reduce oxidation of rubber). Odometer was 23071 miles / 37121 km. Old rear tube still had plenty of liquid sealant, but little in old front tube.
Comments after 17th tour (odometer 24570 miles / 39533 km)
Nov 2021 - Jan 2022, 80 day, 1475 mile / 2373 km tour of Mojave Desert of southern California, described in detail here.
Rodent chewed through straps of one pannier, but able to make field repair using cord from repair kit. Rodent also partially chewed saddlebag straps. Rack bag stitching worn in places. Repaired everything upon return to Reno.
3 flats, all requiring dismounting of tire to remove large thorn from inside of tire. For first flat, just barely able to squeeze enough rubber cement from one tube in repair kit to apply patch. Other tube was completely dry. Need to replace tubes of rubber cement yearly, because they evidently can slowly dry out even if factory seal intact. And bring 4 instead of 2 tubes in repair kit. Note that small tubes of rubber cement can often be found at hardware and auto parts stores. Last 2 flats occurred at end of tour, from thorns in city park.
While fixing flat, noticed missing screw used to attach Rohloff external shifter box to hub. Current screws are 17mm long, which appears too short, so that screw doesn't actually thread into socket, but merely holds box from rotating, then axle holds box tight against hub. Maybe 17mm screws intended for regular hub, but longer screws needed for hub with disk brake option. tbc ask thorn about this... When ordering replacement screws, also order Rohloff splined socket carrier, chainring, splined socket, tires, tubes, saddle, shorter spare saddle bolt, tbc.
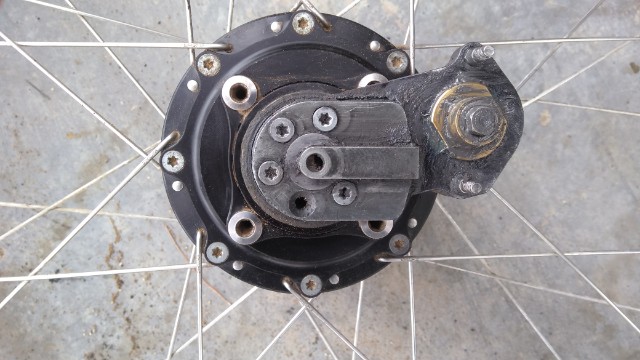
Upon return to Reno, replaced one Dromedary 6L bladder, same bladder that was repaired after previous tour.
Annual maintenance: replace chain with new SRAM PC-850; oil change; grease Rohloff box. Some noise from mismatch between new chain and worn chainring and Rohloff sprocket. Oil change tube came disconnected from syringe. So seamgrip glue isn't foolproof, though at least it held for 10 years and 10+ oil changes.
Replenished consumables: sealant, chain cleaner, lube, patch kits.
Comments after 18th tour (odometer 25932 miles / 41725 km)
Nov 2022 - Jan 2023, 71 day, 1216 mile / 1858 km tour of Mojave Desert of southern California, described in detail here.
Rodent chewed various gear items but able to make field repairs and then further repairs upon return to Reno.
1 flat in front tire, requiring dismounting and use of pliers to remove tiny wire from inside wall of tire.
1 Dromedary bladder leaking, so replaced with spare in storage.
Cracks in vinyl of Selle SMP TRK Medium saddle (last replaced 34721, usage 7004). Replaced initially with leather Selle SMP Lite 209, which was uncomfortable because of my upright riding position, then with leather SMP Selle Avant, which was very comfortable. Leather more expensive than vinyl and not as resistant to rain, but might last longer and be more comfortable because it absorbs moisture. Specs below from Selle SMP website:
TRK Medium sit bone width 9.0 - 12.4cm 160mm wide x 280mm long 405g TRK Large sit bone width 12.5 - 15.0cm 177mm wide x 272mm long 410g Lite 209 (leather, steel rails) sit bone width 11.5 - 14.0cm 139mm wide x 273mm long 335g Avant (leather, steel rails) sit bone width 12.1 - 15.0cm 154mm wide x 269mm long 365g
Replaced seatpost. Usage only 8816 km, but will exceed replacement interval of 10000km during next trip. Because I sit mostly upright, seatpost subject to heavy stress on each pedal stroke, causing aluminum microfractures, eventually leading to seatpost failure, so don't want to delay replacing, especially since not expensive and replacement easy. Put bolt from old seatpost into repair kit, in case another failure like at 32719 km.
Tried installing axle plate screws discussed in previous trip report with longer versions recommended by Thorn and ordered from SJSCylces, but these longer screws didn't want to screw in place, even though I greased them. I assumed problem was white loctite wrapped around screw threads, so I applied some force to Torx screwdriver and then new screw sheared in half! Removed axle plate but unable to remove sheared screw using pliers because shearing was almost level with hub. Put everything back together using 4 screws as shown in previous trip report. These screws are loose and can fall out, so trimmed down remaining 5 longer screws (came in set of 6, with 1 spare) using hacksaw and will carry these in repair kit. I will also be very careful when fixing rear flats, so as to avoid losing these screws. Maybe wrap with loctite tape so they can't fall out. Not sure what went wrong with initial build. Maybe something inside hub slightly misaligned so that correct sized screws wouldn't install and builder got impatient and used short screws as sloppy workaround.
Replaced screw-on Rohloff sprocket (last replaced 23313, usage 18412) with new design, consisting of slim version screw-on splined sprocket carrier with lockring to hold splined sprocket in place. Splined sprockets much less expensive than screw-on sprocket, so included spare in order. Decided to change gearing from 36/17 to 40/19, so also replaced chainring (last replaced 8492, usage 33233). Since sprocket can be reversed and steel chainring wears slowly, should be set for next 10-20 years. Sprocket removal tool slipped in bench vise while removing existing screw-on sprocket, which caused some stripping of aluminum hub. However, I was able to file down spurs from stripping and successfully screw new sprocket carrier in place. Probably won't ever have to remove this sprocket carrier.
Replaced bottom bracket (last replaced 18795, usage 22750) with another Shimano UN55 73x110mm sealed cartridge. No need to replace but spare in storage and might as well put it to use and be done with bottom bracket for next 10-20 years. BB replacement requires special tools, and since already visiting Reno Bike Project workshop to replace Rohloff sprocket, another reason to replace now instead of waiting. Measured chainline of 55mm with Surly chainring, which is exactly what Rohloff recommends for new splined sprocket carrier.
Replaced brake cables (last replaced 5595 front, 29828 rear). Front cable overdue for replacement. Brake pads (last replaced 15072 front, 20278 rear) still in good condition and two sets of spares available (one in repair kit, one in storage), so no need to replace or order more spares.
Replenished consumables: chain cleaner, lube, patch kits.
Annual maintenance: oil change; grease Rohloff box, new SRAM PC-830 chain (removed 5 full links from original 114).
Comments after 19th tour (odometer 27243 miles / 43834 km)
Nov 2023 - Jan 2024, 72 day, 1206 miles / 1940 km tour of Mojave Desert of southern California, described in detail here.
1 flat in front tire, requiring dismounting and use of pliers to remove thorn fragment from inside wall of tire, application of patch to tube, refill of tube with new bottle sealant. Flat in rear tire sealed automatically by sealant, without need to dismount tire, just reinflate tube.
1 Dromedary bladder leaking, so replaced with spare in storage.
Something wrong with Rohloff shifter so only getting 13 gears, with gear 14 missing. Not sure when this problem started. tbc
Replenished consumables: chain cleaner, lube, patch kits.
Annual maintenance: oil change; grease Rohloff box, new SRAM PC-830 chain (removed 5 full links from original 114).
[10 months later] Dismounted rear tire, removed numerous thorn fragments from inside of tire, patched three small punctures of inner tube that had been temporarily sealed by sealant, added another bottle of sealant to rear tube.
Comments after 20th tour (odometer 28020 miles / 45084 km)
Dec 2024 - Jan 2025, 52 day, 667 miles / 1073 km tour of Mojave Desert of southern California, described in detail here.
Noticed rust on both front forks, but especially right side fork, on inside surface where tire passes. Paint probably abraded by mud and rocks kicked up by front tire, thus allowing rust. Forks are original equipment, so 13 years of usage, and rust superficial, so should be okay, though need to monitor situation.
Bladders carried in front planners, both used on several previous tires, appeared to have very slow leaks towards end of tour. Probably both bladders okay for another tour.
Annual maintenance: new chain (Shimano 8 speed, since no SRAM PC-830 in stock), tbc
Replenished consumables: chain cleaner, tbc
tbc oil change; grease Rohloff box, 1 bottle lube, 1 patch kit
Comments after 21th tour (odometer 28806 / 46349 km)
Nov 2025 - Jan 2026, 71 day, 702 miles / 1130 km) tour of Mojave Desert of southern California, described in detail here.
Replaced two bladders that were mentioned as leaking after previous tour.
Brand new bottle of lube, inside factory plastic wrap, leaked all over saddle bag because cap not fully tightened. Luckily, carrying another full bottle and half used bottle, so no shortage of lube. Need to remove lube from factory wrap and verify cap secure.
Flat in front tire from old patch bursting off due to rolling downhill at high speed and hitting a rock. Damage to tube not repairable, so replaced with tube from repair kit.
Replace CR2032 battery in bicycle computer with battery from repair kit.
Annual maintenance: new chain (KMZ 7 speed, since no SRAM PC-830 in stock), tbc oil change; grease Rohloff box.
Replenished consumables and repair kit items: chain cleaner, 1 bottle lube, 1 bottle sealant, 1 inner tube, 1 CR2032 battery.
Rear tire worn, whereas front tire still has plenty of tread, so swapped tires. Ordered spare set of 50-559 Schwalbe Mondial (55-559 no longer available) for inventory in storage locker.
TBC To be continued...
Summary of bicycle touring
As of Jan 2026, total of 22 long tours (1 tour with Novara bicycle in 2011, 21 tours with Nomad bicycle, not counting short tour to Lake Tahoe). Total distance on long tours: 29656 miles (47716 km). Total days away from Reno (including days of zero pedaling): 1161. Total nights camping: 828. tbc
Replacement schedule
First number is odometer reading (km) when component put into use. Replacement interval (km) in parentheses only for consumable components whose failure is sudden and complete rather than gradual and whose failure makes safe riding impossible. Parts like brake pads, sprocket, panniers, etc fail gradually. Failure of fragile components like mirror, computer, plastic lock bracket, etc does not prevent safe riding, plus I carry spares for some fragile components. Frame, fork, skewers, etc should never need replacing, other than if bicycle involved in crash or if allowed to rust. In theory, rims are consumables and failure would be sudden and disastrous, however replacement interval not known. Because I ride mostly upright, stress on seatpost much higher than on handlebars, therefore replacement intervals differ. Stem is short, cranks are heavy, and brakes are under light stress, so these parts should last indefinitely, despite being aluminum. Rear rack subject to wear from pannier hooks, but should last another 20 years at current rate of wear, plus I have spare in storage.
- 0: wheels, hubs, skewers, fork, stem, front and rear brakes, cranks, shifter and brake cable housings, hand grips, racks, accessory bars, ortlieb panniers (repaired several times), bicycle computer, bottle carriers
- 15072: front brake pads
- 20278: rear brake pads
- 25143: mirror
- 29828: frame, headset, handlebars (30000), shifter cables (20000)
- 32909: rubber shift grip, lock cylinder
- 33387: pedals (15000)
- 34721: plastic lock bracket
- 36981: lezyne pump tube, front panniers
- 37121: tires/tubes/rim strips (13000)
- 41725: seatpost (10000), sprocket carrier, sprocket, chainring, bottom bracket, brake cables (30000)
- 43972: saddle (30000)
Inventory in storage locker or repair kit
- 7 bottles sealant (2 in repair kit)
- 5 rim strips (2 in repair kit)
- 2 seatposts
- tbc